PostgreSQL replication and failover with Omnibus GitLab (PREMIUM ONLY)
This document focuses on configuration supported with GitLab Premium, using the Omnibus GitLab package. If you're a Community Edition or Starter user, consider using a cloud hosted solution. This document doesn't cover installations from source.
If a setup with replication and failover isn't what you were looking for, see the database configuration document for the Omnibus GitLab packages.
It's recommended to read this document fully before attempting to configure PostgreSQL with replication and failover for GitLab.
Architecture
The Omnibus GitLab recommended configuration for a PostgreSQL cluster with replication and failover requires:
- A minimum of three database nodes.
- A minimum of three
Consulserver nodes. - A minimum of one
pgbouncerservice node, but it's recommended to have one per database node.- An internal load balancer (TCP) is required when there is more than one
pgbouncerservice node.
- An internal load balancer (TCP) is required when there is more than one
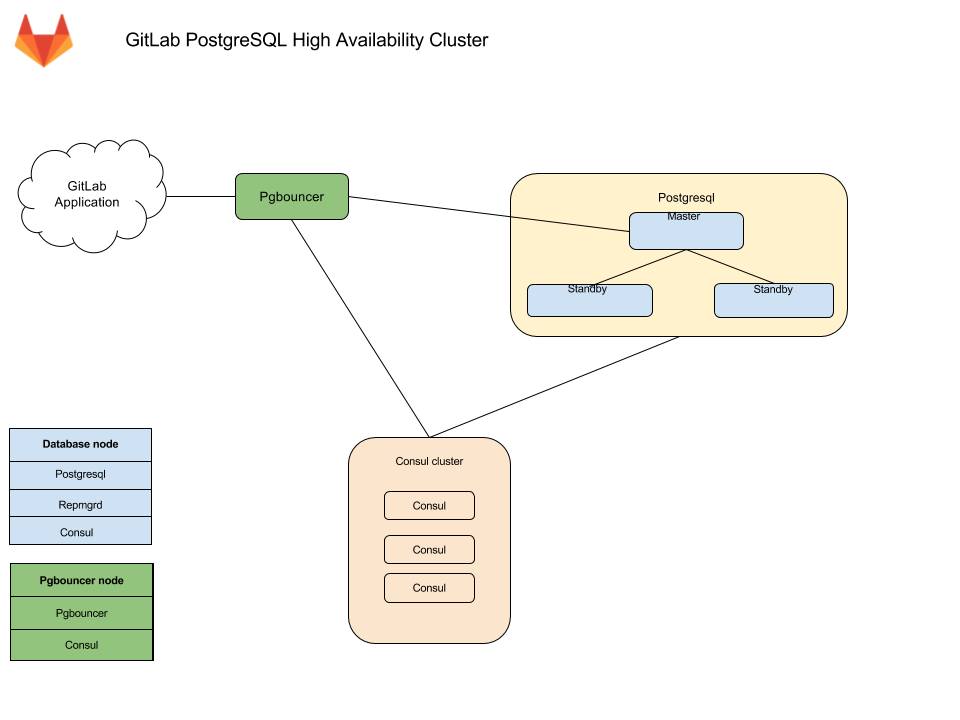
You also need to take into consideration the underlying network topology, making sure you have redundant connectivity between all Database and GitLab instances to avoid the network becoming a single point of failure.
NOTE: As of GitLab 13.3, PostgreSQL 12 is shipped with Omnibus GitLab. Clustering for PostgreSQL 12 is only supported with Patroni. See the Patroni section for further details. The support for repmgr will not be extended beyond PostgreSQL 11.
Database node
Each database node runs three services:
PostgreSQL - The database itself.
Patroni - Communicates with other patroni services in the cluster and handles
failover when issues with the leader server occurs. The failover procedure
consists of:
- Selecting a new leader for the cluster.
- Promoting the new node to leader.
- Instructing remaining servers to follow the new leader node.
Consul agent - To communicate with Consul cluster which stores the current Patroni state. The agent monitors the status of each node in the database cluster and tracks its health in a service definition on the Consul cluster.
Consul server node
The Consul server node runs the Consul server service. These nodes must have reached the quorum and elected a leader before Patroni cluster bootstrap otherwise database nodes will wait until such Consul leader is elected.
PgBouncer node
Each PgBouncer node runs two services:
PgBouncer - The database connection pooler itself.
Consul agent - Watches the status of the PostgreSQL service definition on the
Consul cluster. If that status changes, Consul runs a script which updates the
PgBouncer configuration to point to the new PostgreSQL master node and reloads
the PgBouncer service.
Connection flow
Each service in the package comes with a set of default ports. You may need to make specific firewall rules for the connections listed below:
- Application servers connect to either PgBouncer directly via its default port or via a configured Internal Load Balancer (TCP) that serves multiple PgBouncers.
- PgBouncer connects to the primary database servers PostgreSQL default port
- Patroni actively manages the running PostgreSQL processes and configuration.
- PostgreSQL secondaries connect to the primary database servers PostgreSQL default port
- Consul servers and agents connect to each others Consul default ports
Setting it up
Required information
Before proceeding with configuration, you will need to collect all the necessary information.
Network information
PostgreSQL doesn't listen on any network interface by default. It needs to know which IP address to listen on to be accessible to other services. Similarly, PostgreSQL access is controlled based on the network source.
This is why you will need:
- IP address of each nodes network interface. This can be set to
0.0.0.0to listen on all interfaces. It cannot be set to the loopback address127.0.0.1. - Network Address. This can be in subnet (i.e.
192.168.0.0/255.255.255.0) or CIDR (i.e.192.168.0.0/24) form.
Consul information
When using default setup, minimum configuration requires:
-
CONSUL_USERNAME. The default user for Omnibus GitLab isgitlab-consul -
CONSUL_DATABASE_PASSWORD. Password for the database user. -
CONSUL_PASSWORD_HASH. This is a hash generated out of Consul username/password pair. Can be generated with:sudo gitlab-ctl pg-password-md5 CONSUL_USERNAME -
CONSUL_SERVER_NODES. The IP addresses or DNS records of the Consul server nodes.
Few notes on the service itself:
- The service runs under a system account, by default
gitlab-consul.- If you are using a different username, you will have to specify it. We
will refer to it with
CONSUL_USERNAME,
- If you are using a different username, you will have to specify it. We
will refer to it with
- There will be a database user created with read only access to the repmgr database
- Passwords will be stored in the following locations:
-
/etc/gitlab/gitlab.rb: hashed -
/var/opt/gitlab/pgbouncer/pg_auth: hashed -
/var/opt/gitlab/consul/.pgpass: plaintext
-
PostgreSQL information
When configuring PostgreSQL, we will set max_wal_senders to one more than
the number of database nodes in the cluster.
This is used to prevent replication from using up all of the
available database connections.
In this document we are assuming 3 database nodes, which makes this configuration:
patroni['postgresql']['max_wal_senders'] = 4As previously mentioned, you'll have to prepare the network subnets that will be allowed to authenticate with the database. You'll also need to supply the IP addresses or DNS records of Consul server nodes.
We will need the following password information for the application's database user:
-
POSTGRESQL_USERNAME. The default user for Omnibus GitLab isgitlab -
POSTGRESQL_USER_PASSWORD. The password for the database user -
POSTGRESQL_PASSWORD_HASH. This is a hash generated out of the username/password pair. Can be generated with:sudo gitlab-ctl pg-password-md5 POSTGRESQL_USERNAME
PgBouncer information
When using default setup, minimum configuration requires:
-
PGBOUNCER_USERNAME. The default user for Omnibus GitLab ispgbouncer -
PGBOUNCER_PASSWORD. This is a password for PgBouncer service. -
PGBOUNCER_PASSWORD_HASH. This is a hash generated out of PgBouncer username/password pair. Can be generated with:sudo gitlab-ctl pg-password-md5 PGBOUNCER_USERNAME -
PGBOUNCER_NODE, is the IP address or a FQDN of the node running PgBouncer.
Few notes on the service itself:
- The service runs as the same system account as the database
- In the package, this is by default
gitlab-psql
- In the package, this is by default
- If you use a non-default user account for PgBouncer service (by default
pgbouncer), you will have to specify this username. We will refer to this requirement withPGBOUNCER_USERNAME. - The service will have a regular database user account generated for it
- This defaults to
repmgr
- This defaults to
- Passwords will be stored in the following locations:
-
/etc/gitlab/gitlab.rb: hashed, and in plain text -
/var/opt/gitlab/pgbouncer/pg_auth: hashed
-
Installing Omnibus GitLab
First, make sure to download/install Omnibus GitLab on each node.
Make sure you install the necessary dependencies from step 1,
add GitLab package repository from step 2.
When installing the GitLab package, do not supply EXTERNAL_URL value.
Configuring the Database nodes
- Make sure to configure the Consul nodes.
- Make sure you collect
CONSUL_SERVER_NODES,PGBOUNCER_PASSWORD_HASH,POSTGRESQL_PASSWORD_HASH, the number of db nodes, and the network address before executing the next step.
Configuring Patroni cluster
You must enable Patroni explicitly to be able to use it (with patroni['enable'] = true). When Patroni is enabled
repmgr will be disabled automatically.
Any PostgreSQL configuration item that controls replication, for example wal_level, max_wal_senders, etc, are strictly
controlled by Patroni and will override the original settings that you make with the postgresql[...] configuration key.
Hence, they are all separated and placed under patroni['postgresql'][...]. This behavior is limited to replication.
Patroni honours any other PostgreSQL configuration that was made with the postgresql[...] configuration key. For example,
max_wal_senders by default is set to 5. If you wish to change this you must set it with the patroni['postgresql']['max_wal_senders']
configuration key.
NOTE:
The configuration of a Patroni node is very similar to a repmgr but shorter. When Patroni is enabled, first you can ignore
any replication setting of PostgreSQL (it will be overwritten anyway). Then you can remove any repmgr[...] or
repmgr-specific configuration as well. Especially, make sure that you remove postgresql['shared_preload_libraries'] = 'repmgr_funcs'.
Here is an example similar to the one that was done with repmgr:
# Disable all components except PostgreSQL, Patroni (or Repmgr), and Consul
roles['postgres_role']

# Enable Patroni (which automatically disables Repmgr).
patroni['enable'] = true

# PostgreSQL configuration
postgresql['listen_address'] = '0.0.0.0'

# Disable automatic database migrations
gitlab_rails['auto_migrate'] = false

# Configure the Consul agent
consul['services'] = %w(postgresql)

# START user configuration
# Please set the real values as explained in Required Information section
#
# Replace PGBOUNCER_PASSWORD_HASH with a generated md5 value
postgresql['pgbouncer_user_password'] = 'PGBOUNCER_PASSWORD_HASH'
# Replace POSTGRESQL_PASSWORD_HASH with a generated md5 value
postgresql['sql_user_password'] = 'POSTGRESQL_PASSWORD_HASH'

# Replace X with value of number of db nodes + 1 (OPTIONAL the default value is 5)
patroni['postgresql']['max_wal_senders'] = X
patroni['postgresql']['max_replication_slots'] = X

# Replace XXX.XXX.XXX.XXX/YY with Network Address
postgresql['trust_auth_cidr_addresses'] = %w(XXX.XXX.XXX.XXX/YY)

# Replace placeholders:
#
# Y.Y.Y.Y consul1.gitlab.example.com Z.Z.Z.Z
# with the addresses gathered for CONSUL_SERVER_NODES
consul['configuration'] = {
  retry_join: %w(Y.Y.Y.Y consul1.gitlab.example.com Z.Z.Z.Z)
}
#
# END user configuration
You do not need an additional or different configuration for replica nodes. As a matter of fact, you don't have to have a predetermined primary node. Therefore all database nodes use the same configuration.
Once the configuration of a node is done, you must reconfigure Omnibus GitLab on each node for the changes to take effect.
Generally, when Consul cluster is ready, the first node that reconfigures becomes the leader. You do not need to sequence the nodes reconfiguration. You can run them in parallel or in any order. If you choose an arbitrary order you do not have any predetermined master.
NOTE: As opposed to repmgr, once the nodes are reconfigured you do not need any further action or additional command to join the replicas.
Enable Monitoring
Introduced in GitLab 12.0.
If you enable Monitoring, it must be enabled on all database servers.
-
Create/edit
/etc/gitlab/gitlab.rband add the following configuration:# Enable service discovery for Prometheus consul['monitoring_service_discovery'] = true # Set the network addresses that the exporters will listen on node_exporter['listen_address'] = '0.0.0.0:9100' postgres_exporter['listen_address'] = '0.0.0.0:9187' -
Run
sudo gitlab-ctl reconfigureto compile the configuration.
Configuring the PgBouncer node
-
Make sure you collect
CONSUL_SERVER_NODES,CONSUL_PASSWORD_HASH, andPGBOUNCER_PASSWORD_HASHbefore executing the next step. -
One each node, edit the
/etc/gitlab/gitlab.rbconfiguration file and replace values noted in the# START user configurationsection as below:# Disable all components except PgBouncer and Consul agent roles ['pgbouncer_role'] # Configure PgBouncer pgbouncer['admin_users'] = %w(pgbouncer gitlab-consul) # Configure Consul agent consul['watchers'] = %w(postgresql) # START user configuration # Please set the real values as explained in Required Information section # Replace CONSUL_PASSWORD_HASH with with a generated md5 value # Replace PGBOUNCER_PASSWORD_HASH with with a generated md5 value pgbouncer['users'] = { 'gitlab-consul': { password: 'CONSUL_PASSWORD_HASH' }, 'pgbouncer': { password: 'PGBOUNCER_PASSWORD_HASH' } } # Replace placeholders: # # Y.Y.Y.Y consul1.gitlab.example.com Z.Z.Z.Z # with the addresses gathered for CONSUL_SERVER_NODES consul['configuration'] = { retry_join: %w(Y.Y.Y.Y consul1.gitlab.example.com Z.Z.Z.Z) } # # END user configurationNOTE:
pgbouncer_rolewas introduced with GitLab 10.3. -
Run
gitlab-ctl reconfigure -
Create a
.pgpassfile so Consul is able to reload PgBouncer. Enter thePGBOUNCER_PASSWORDtwice when asked:gitlab-ctl write-pgpass --host 127.0.0.1 --database pgbouncer --user pgbouncer --hostuser gitlab-consul
PgBouncer Checkpoint
-
Ensure each node is talking to the current master:
gitlab-ctl pgb-console # You will be prompted for PGBOUNCER_PASSWORDIf there is an error
psql: ERROR: Auth failedafter typing in the password, ensure you previously generated the MD5 password hashes with the correct format. The correct format is to concatenate the password and the username:PASSWORDUSERNAME. For example,Sup3rS3cr3tpgbouncerwould be the text needed to generate an MD5 password hash for thepgbounceruser. -
Once the console prompt is available, run the following queries:
show databases ; show clients ;The output should be similar to the following:
        name         |  host       | port |      database       | force_user | pool_size | reserve_pool | pool_mode | max_connections | current_connections
---------------------+-------------+------+---------------------+------------+-----------+--------------+-----------+-----------------+---------------------
 gitlabhq_production | MASTER_HOST | 5432 | gitlabhq_production |            |        20 |            0 |           |               0 |                   0
 pgbouncer           |             | 6432 | pgbouncer           | pgbouncer  |         2 |            0 | statement |               0 |                   0
(2 rows)

 type |   user    |      database       |  state  |   addr         | port  | local_addr | local_port |    connect_time     |    request_time     |    ptr    | link | remote_pid | tls
------+-----------+---------------------+---------+----------------+-------+------------+------------+---------------------+---------------------+-----------+------+------------+-----
 C    | pgbouncer | pgbouncer           | active  | 127.0.0.1      | 56846 | 127.0.0.1  |       6432 | 2017-08-21 18:09:59 | 2017-08-21 18:10:48 | 0x22b3880 |      |          0 |
(2 rows)
Configure the internal load balancer
If you're running more than one PgBouncer node as recommended, then at this time you'll need to set up a TCP internal load balancer to serve each correctly. This can be done with any reputable TCP load balancer.
As an example here's how you could do it with HAProxy:
global
    log /dev/log local0
    log localhost local1 notice
    log stdout format raw local0

defaults
    log global
    default-server inter 10s fall 3 rise 2
    balance leastconn

frontend internal-pgbouncer-tcp-in
    bind *:6432
    mode tcp
    option tcplog

    default_backend pgbouncer

backend pgbouncer
    mode tcp
    option tcp-check

    server pgbouncer1 <ip>:6432 check
    server pgbouncer2 <ip>:6432 check
    server pgbouncer3 <ip>:6432 check
Refer to your preferred Load Balancer's documentation for further guidance.
Configuring the Application nodes
These will be the nodes running the gitlab-rails service. You may have other
attributes set, but the following need to be set.
-
Edit
/etc/gitlab/gitlab.rb:# Disable PostgreSQL on the application node postgresql['enable'] = false gitlab_rails['db_host'] = 'PGBOUNCER_NODE' or 'INTERNAL_LOAD_BALANCER' gitlab_rails['db_port'] = 6432 gitlab_rails['db_password'] = 'POSTGRESQL_USER_PASSWORD' gitlab_rails['auto_migrate'] = false -
Reconfigure GitLab for the changes to take effect.
Application node post-configuration
Ensure that all migrations ran:
gitlab-rake gitlab:db:configureNote: If you encounter a
rake aborted!error stating that PgBouncer is failing to connect to PostgreSQL it may be that your PgBouncer node's IP address is missing from PostgreSQL'strust_auth_cidr_addressesingitlab.rbon your database nodes. See PgBouncer errorERROR: pgbouncer cannot connect to serverin the Troubleshooting section before proceeding.
Backups
Do not backup or restore GitLab through a PgBouncer connection: this will cause a GitLab outage.
Read more about this and how to reconfigure backups.
Ensure GitLab is running
At this point, your GitLab instance should be up and running. Verify you're able to sign in, and create issues and merge requests. If you encounter issues, see the Troubleshooting section.
Example configuration
This section describes several fully expanded example configurations.
Example recommended setup
This example uses three Consul servers, three PgBouncer servers (with an associated internal load balancer), three PostgreSQL servers, and one application node.
We start with all servers on the same 10.6.0.0/16 private network range, they can connect to each freely other on those addresses.
Here is a list and description of each machine and the assigned IP:
-
10.6.0.11: Consul 1 -
10.6.0.12: Consul 2 -
10.6.0.13: Consul 3 -
10.6.0.20: Internal Load Balancer -
10.6.0.21: PgBouncer 1 -
10.6.0.22: PgBouncer 2 -
10.6.0.23: PgBouncer 3 -
10.6.0.31: PostgreSQL 1 -
10.6.0.32: PostgreSQL 2 -
10.6.0.33: PostgreSQL 3 -
10.6.0.41: GitLab application
All passwords are set to toomanysecrets, please do not use this password or derived hashes and the external_url for GitLab is http://gitlab.example.com.
Please note that after the initial configuration, if a failover occurs, the PostgresSQL master will change to one of the available secondaries until it is failed back.
Example recommended setup for Consul servers
On each server edit /etc/gitlab/gitlab.rb:
# Disable all components except Consul
roles ['consul_role']

consul['configuration'] = {
  server: true,
  retry_join: %w(10.6.0.11 10.6.0.12 10.6.0.13)
}
consul['monitoring_service_discovery'] =  true
Reconfigure Omnibus GitLab for the changes to take effect.
Example recommended setup for PgBouncer servers
On each server edit /etc/gitlab/gitlab.rb:
# Disable all components except Pgbouncer and Consul agent
roles ['pgbouncer_role']

# Configure PgBouncer
pgbouncer['admin_users'] = %w(pgbouncer gitlab-consul)

pgbouncer['users'] = {
  'gitlab-consul': {
    password: '5e0e3263571e3704ad655076301d6ebe'
  },
  'pgbouncer': {
    password: '771a8625958a529132abe6f1a4acb19c'
  }
}

consul['watchers'] = %w(postgresql)
consul['enable'] = true
consul['configuration'] = {
  retry_join: %w(10.6.0.11 10.6.0.12 10.6.0.13)
}
consul['monitoring_service_discovery'] =  true
Reconfigure Omnibus GitLab for the changes to take effect.
Internal load balancer setup
An internal load balancer (TCP) is then required to be setup to serve each PgBouncer node (in this example on the IP of 10.6.0.20). An example of how to do this can be found in the PgBouncer Configure Internal Load Balancer section.
Example recommended setup for PostgreSQL servers
On database nodes edit /etc/gitlab/gitlab.rb:
# Disable all components except PostgreSQL, Patroni (or Repmgr), and Consul
roles ['postgres_role']

# PostgreSQL configuration
postgresql['listen_address'] = '0.0.0.0'
postgresql['hot_standby'] = 'on'
postgresql['wal_level'] = 'replica'

# Enable Patroni (which automatically disables Repmgr).
patroni['enable'] = true

# Disable automatic database migrations
gitlab_rails['auto_migrate'] = false

postgresql['pgbouncer_user_password'] = '771a8625958a529132abe6f1a4acb19c'
postgresql['sql_user_password'] = '450409b85a0223a214b5fb1484f34d0f'
patroni['postgresql']['max_wal_senders'] = 4

postgresql['trust_auth_cidr_addresses'] = %w(10.6.0.0/16)

# Configure the Consul agent
consul['services'] = %w(postgresql)
consul['enable'] = true
consul['configuration'] = {
  retry_join: %w(10.6.0.11 10.6.0.12 10.6.0.13)
}
consul['monitoring_service_discovery'] =  true
Reconfigure Omnibus GitLab for the changes to take effect.
Example recommended setup manual steps
After deploying the configuration follow these steps:
-
Find the primary database node:
gitlab-ctl get-postgresql-primary -
On the primary database node:
Enable the
pg_trgmandbtree_gistextensions:gitlab-psql -d gitlabhq_productionCREATE EXTENSION pg_trgm; CREATE EXTENSION btree_gist; -
On
10.6.0.41, our application server:Set
gitlab-consuluser's PgBouncer password totoomanysecrets:gitlab-ctl write-pgpass --host 127.0.0.1 --database pgbouncer --user pgbouncer --hostuser gitlab-consulRun database migrations:
gitlab-rake gitlab:db:configure
Example minimal setup
This example uses 3 PostgreSQL servers, and 1 application node (with PgBouncer setup alongside).
It differs from the recommended setup by moving the Consul servers into the same servers we use for PostgreSQL. The trade-off is between reducing server counts, against the increased operational complexity of needing to deal with PostgreSQL failover procedures in addition to Consul outage recovery on the same set of machines.
In this example we start with all servers on the same 10.6.0.0/16 private network range, they can connect to each freely other on those addresses.
Here is a list and description of each machine and the assigned IP:
-
10.6.0.21: PostgreSQL 1 -
10.6.0.22: PostgreSQL 2 -
10.6.0.23: PostgreSQL 3 -
10.6.0.31: GitLab application
All passwords are set to toomanysecrets, please do not use this password or derived hashes.
The external_url for GitLab is http://gitlab.example.com
Please note that after the initial configuration, if a failover occurs, the PostgresSQL master will change to one of the available secondaries until it is failed back.
Example minimal configuration for database servers
On database nodes edit /etc/gitlab/gitlab.rb:
# Disable all components except PostgreSQL, Repmgr, and Consul
roles ['postgres_role']

# PostgreSQL configuration
postgresql['listen_address'] = '0.0.0.0'
postgresql['hot_standby'] = 'on'
postgresql['wal_level'] = 'replica'

# Enable Patroni (which automatically disables Repmgr).
patroni['enable'] = true

# Disable automatic database migrations
gitlab_rails['auto_migrate'] = false

# Configure the Consul agent
consul['services'] = %w(postgresql)

postgresql['pgbouncer_user_password'] = '771a8625958a529132abe6f1a4acb19c'
postgresql['sql_user_password'] = '450409b85a0223a214b5fb1484f34d0f'
patroni['postgresql']['max_wal_senders'] = 4

postgresql['trust_auth_cidr_addresses'] = %w(10.6.0.0/16)

consul['configuration'] = {
  server: true,
  retry_join: %w(10.6.0.21 10.6.0.22 10.6.0.23)
}
Reconfigure Omnibus GitLab for the changes to take effect.
Example minimal configuration for application server
On the server edit /etc/gitlab/gitlab.rb:
external_url 'http://gitlab.example.com'

gitlab_rails['db_host'] = '127.0.0.1'
gitlab_rails['db_port'] = 6432
gitlab_rails['db_password'] = 'toomanysecrets'
gitlab_rails['auto_migrate'] = false

postgresql['enable'] = false
pgbouncer['enable'] = true
consul['enable'] = true

# Configure PgBouncer
pgbouncer['admin_users'] = %w(pgbouncer gitlab-consul)

# Configure Consul agent
consul['watchers'] = %w(postgresql)

pgbouncer['users'] = {
  'gitlab-consul': {
    password: '5e0e3263571e3704ad655076301d6ebe'
  },
  'pgbouncer': {
    password: '771a8625958a529132abe6f1a4acb19c'
  }
}

consul['configuration'] = {
  retry_join: %w(10.6.0.21 10.6.0.22 10.6.0.23)
}
Reconfigure Omnibus GitLab for the changes to take effect.
Example minimal setup manual steps
The manual steps for this configuration are the same as for the example recommended setup.
Patroni
NOTE: Using Patroni instead of Repmgr is supported for PostgreSQL 11 and required for PostgreSQL 12.
Patroni is an opinionated solution for PostgreSQL high-availability. It takes the control of PostgreSQL, overrides its configuration and manages its lifecycle (start, stop, restart). This is a more active approach when compared to repmgr. Both repmgr and Patroni are both supported and available. But Patroni will be the default (and perhaps the only) option for PostgreSQL 12 clustering and cascading replication for Geo deployments.
The architecture (that was mentioned above) does not change for Patroni. You do not need any special consideration for Patroni while provisioning your database nodes. Patroni heavily relies on Consul to store the state of the cluster and elect a leader. Any failure in Consul cluster and its leader election will propagate to Patroni cluster as well.
Similar to repmgr, Patroni monitors the cluster and handles failover. When the primary node fails it works with Consul to notify PgBouncer. However, as opposed to repmgr, on failure, Patroni handles the transitioning of the old primary to a replica and rejoins it to the cluster automatically. So you do not need any manual operation for recovering the cluster as you do with repmgr.
With Patroni the connection flow is slightly different. Patroni on each node connects to Consul agent to join the cluster. Only after this point it decides if the node is the primary or a replica. Based on this decision, it configures and starts PostgreSQL which it communicates with directly over a Unix socket. This implies that if Consul cluster is not functional or does not have a leader, Patroni and by extension PostgreSQL will not start. Patroni also exposes a REST API which can be accessed via its default port on each node.
Selecting the appropriate Patroni replication method
Review the Patroni documentation carefully before making changes as some of the options carry a risk of potential data loss if not fully understood. The replication mode configured determines the amount of tolerable data loss.
WARNING: Replication is not a backup strategy! There is no replacement for a well-considered and tested backup solution.
Omnibus GitLab defaults synchronous_commit to on.
postgresql['synchronous_commit'] = 'on'
gitlab['geo-postgresql']['synchronous_commit'] = 'on'
Customizing Patroni failover behavior
Omnibus GitLab exposes several options allowing more control over the Patroni restoration process.
Each option is shown below with its default value in /etc/gitlab/gitlab.rb.
patroni['use_pg_rewind'] = true
patroni['remove_data_directory_on_rewind_failure'] = false
patroni['remove_data_directory_on_diverged_timelines'] = false
The upstream documentation will always be more up to date, but the table below should provide a minimal overview of functionality.
| Setting | Overview |
|---|---|
use_pg_rewind |
Try running pg_rewind on the former cluster leader before it rejoins the database cluster. |
remove_data_directory_on_rewind_failure |
If pg_rewind fails, remove the local PostgreSQL data directory and re-replicate from the current cluster leader. |
remove_data_directory_on_diverged_timelines |
If pg_rewind cannot be used and the former leader's timeline has diverged from the current one, then delete the local data directory and re-replicate from the current cluster leader. |
Database authorization for Patroni
Patroni uses Unix socket to manage PostgreSQL instance. Therefore, the connection from the local socket must be trusted.
Also, replicas use the replication user (gitlab_replicator by default) to communicate with the leader. For this user,
you can choose between trust and md5 authentication. If you set postgresql['sql_replication_password'],
Patroni will use md5 authentication, otherwise it falls back to trust. You must to specify the cluster CIDR in
postgresql['md5_auth_cidr_addresses'] or postgresql['trust_auth_cidr_addresses'] respectively.
Interacting with Patroni cluster
You can use gitlab-ctl patroni members to check the status of the cluster members. To check the status of each node
gitlab-ctl patroni provides two additional sub-commands, check-leader and check-replica which indicate if a node
is the primary or a replica.
When Patroni is enabled, you don't have direct control over postgresql service. Patroni will signal PostgreSQL's startup,
shutdown, and restart. For example, for shutting down PostgreSQL on a node, you must shutdown Patroni on the same node
with:
sudo gitlab-ctl stop patroniNote that stopping or restarting Patroni service on the leader node will trigger the automatic failover. If you
want to signal Patroni to reload its configuration or restart PostgreSQL process without triggering the failover, you
must use the reload or restart sub-commands of gitlab-ctl patroni instead. These two sub-commands are wrappers of
the same patronictl commands.
Manual failover procedure for Patroni
While Patroni supports automatic failover, you also have the ability to perform a manual one, where you have two slightly different options:
-
Failover: allows you to perform a manual failover when there are no healthy nodes. You can perform this action in any PostgreSQL node:
sudo gitlab-ctl patroni failover -
Switchover: only works when the cluster is healthy and allows you to schedule a switchover (it can happen immediately). You can perform this action in any PostgreSQL node:
sudo gitlab-ctl patroni switchover
For further details on this subject, see the Patroni documentation.
Geo secondary site considerations
Similar to repmgr, when a Geo secondary site is replicating from a primary site that uses Patroni and PgBouncer, replicating through PgBouncer is not supported and the secondary must replicate directly from the leader node in the Patroni cluster. Therefore, when there is an automatic or manual failover in the Patroni cluster, you will need to manually re-point your secondary site to replicate from the new leader with:
sudo gitlab-ctl replicate-geo-database --host=<new_leader_ip> --replication-slot=<slot_name>Otherwise, the replication will not happen anymore, even if the original node gets re-added as a follower node. This will re-sync your secondary site database and may take a long time depending on the amount of data to sync. You may also need to run gitlab-ctl reconfigure if replication is still not working after re-syncing.
Recovering the Patroni cluster
To recover the old primary and rejoin it to the cluster as a replica, you can simply start Patroni with:
sudo gitlab-ctl start patroniNo further configuration or intervention is needed.
Maintenance procedure for Patroni
With Patroni enabled, you can run a planned maintenance. If you want to do some maintenance work on one node and you don't want Patroni to manage it, you can use put it into maintenance mode:
sudo gitlab-ctl patroni pauseWhen Patroni runs in a paused mode, it does not change the state of PostgreSQL. Once you are done you can resume Patroni:
sudo gitlab-ctl patroni resumeFor further details, see Patroni documentation on this subject.
Switching from repmgr to Patroni
WARNING: Although switching from repmgr to Patroni is fairly straightforward the other way around is not. Rolling back from Patroni to repmgr can be complicated and may involve deletion of data directory. If you need to do that, please contact GitLab support.
You can switch an exiting database cluster to use Patroni instead of repmgr with the following steps:
-
Stop repmgr on all replica nodes and lastly with the primary node:
sudo gitlab-ctl stop repmgrd -
Stop PostgreSQL on all replica nodes:
sudo gitlab-ctl stop postgresqlNOTE: Ensure that there is no
walsenderprocess running on the primary node.ps aux | grep walsendermust not show any running process. -
On the primary node, configure Patroni. Remove
repmgrand any other repmgr-specific configuration. Also remove any configuration that is related to PostgreSQL replication. -
Reconfigure Omnibus GitLab on the primary node. It will become the leader. You can check this with:
sudo gitlab-ctl tail patroni -
Repeat the last two steps for all replica nodes.
gitlab.rbshould look the same on all nodes. -
Optional: You can remove
gitlab_repmgrdatabase and role on the primary.
Upgrading PostgreSQL major version in a Patroni cluster
As of GitLab 13.3, PostgreSQL 11.7 and 12.3 are both shipped with Omnibus GitLab, and as of GitLab 13.7 PostgreSQL 12 is used by default. If you want to upgrade to PostgreSQL 12 in versions prior to GitLab 13.7, you must ask for it explicitly.
WARNING: The procedure for upgrading PostgreSQL in a Patroni cluster is different than when upgrading using repmgr. The following outlines the key differences and important considerations that need to be accounted for when upgrading PostgreSQL.
Here are a few key facts that you must consider before upgrading PostgreSQL:
-
The main point is that you will have to shut down the Patroni cluster. This means that your GitLab deployment will be down for the duration of database upgrade or, at least, as long as your leader node is upgraded. This can be a significant downtime depending on the size of your database.
-
Upgrading PostgreSQL creates a new data directory with a new control data. From Patroni's perspective this is a new cluster that needs to be bootstrapped again. Therefore, as part of the upgrade procedure, the cluster state, which is stored in Consul, will be wiped out. Once the upgrade is completed, Patroni will be instructed to bootstrap a new cluster. Note that this will change your cluster ID.
-
The procedures for upgrading leader and replicas are not the same. That is why it is important to use the right procedure on each node.
-
Upgrading a replica node deletes the data directory and resynchronizes it from the leader using the configured replication method (currently
pg_basebackupis the only available option). It might take some time for replica to catch up with the leader, depending on the size of your database. -
An overview of the upgrade procedure is outlined in Patoni's documentation. You can still use
gitlab-ctl pg-upgradewhich implements this procedure with a few adjustments.
Considering these, you should carefully plan your PostgreSQL upgrade:
-
Find out which node is the leader and which node is a replica:
gitlab-ctl patroni membersNOTE:
gitlab-ctl pg-upgradetries to detect the role of the node. If for any reason the auto-detection does not work or you believe it did not detect the role correctly, you can use the--leaderor--replicaarguments to manually override it. -
Stop Patroni only on replicas.
sudo gitlab-ctl stop patroni -
Enable the maintenance mode on the application node:
sudo gitlab-ctl deploy-page up -
Upgrade PostgreSQL on the leader node and make sure that the upgrade is completed successfully:
sudo gitlab-ctl pg-upgrade -V 12 -
Check the status of the leader and cluster. You can only proceed if you have a healthy leader:
gitlab-ctl patroni check-leader # OR gitlab-ctl patroni members -
You can now disable the maintenance mode on the application node:
sudo gitlab-ctl deploy-page down -
Upgrade PostgreSQL on replicas (you can do this in parallel on all of them):
sudo gitlab-ctl pg-upgrade -V 12
NOTE:
Reverting PostgreSQL upgrade with gitlab-ctl revert-pg-upgrade has the same considerations as
gitlab-ctl pg-upgrade. You should follow the same procedure by first stopping the replicas,
then reverting the leader, and finally reverting the replicas.
Repmgr
NOTE: Using Patroni instead of Repmgr is supported for PostgreSQL 11 and required for PostgreSQL 12.
Configuring Repmgr Nodes
-
On the master database node, edit
/etc/gitlab/gitlab.rbreplacing values noted in the# START user configurationsection:# Disable all components except PostgreSQL and Repmgr and Consul roles ['postgres_role'] # PostgreSQL configuration postgresql['listen_address'] = '0.0.0.0' postgresql['hot_standby'] = 'on' postgresql['wal_level'] = 'replica' postgresql['shared_preload_libraries'] = 'repmgr_funcs' # Disable automatic database migrations gitlab_rails['auto_migrate'] = false # Configure the Consul agent consul['services'] = %w(postgresql) # START user configuration # Please set the real values as explained in Required Information section # # Replace PGBOUNCER_PASSWORD_HASH with a generated md5 value postgresql['pgbouncer_user_password'] = 'PGBOUNCER_PASSWORD_HASH' # Replace POSTGRESQL_PASSWORD_HASH with a generated md5 value postgresql['sql_user_password'] = 'POSTGRESQL_PASSWORD_HASH' # Replace X with value of number of db nodes + 1 postgresql['max_wal_senders'] = X postgresql['max_replication_slots'] = X # Replace XXX.XXX.XXX.XXX/YY with Network Address postgresql['trust_auth_cidr_addresses'] = %w(XXX.XXX.XXX.XXX/YY) repmgr['trust_auth_cidr_addresses'] = %w(127.0.0.1/32 XXX.XXX.XXX.XXX/YY) # Replace placeholders: # # Y.Y.Y.Y consul1.gitlab.example.com Z.Z.Z.Z # with the addresses gathered for CONSUL_SERVER_NODES consul['configuration'] = { retry_join: %w(Y.Y.Y.Y consul1.gitlab.example.com Z.Z.Z.Z) } # # END user configurationpostgres_rolewas introduced with GitLab 10.3 -
On secondary nodes, add all the configuration specified above for primary node to
/etc/gitlab/gitlab.rb. In addition, append the following configuration to informgitlab-ctlthat they are standby nodes initially and it need not attempt to register them as primary node# Specify if a node should attempt to be master on initialization repmgr['master_on_initialization'] = false -
Reconfigure GitLab for the changes to take effect.
Please note:
- If you want your database to listen on a specific interface, change the configuration:
postgresql['listen_address'] = '0.0.0.0'.- If your PgBouncer service runs under a different user account, you also need to specify:
postgresql['pgbouncer_user'] = PGBOUNCER_USERNAMEin your configuration.
Database nodes post-configuration
Primary node
Select one node as a primary node.
-
Open a database prompt:
gitlab-psql -d gitlabhq_production -
Enable the
pg_trgmextension:CREATE EXTENSION pg_trgm; -
Enable the
btree_gistextension:CREATE EXTENSION btree_gist; -
Exit the database prompt by typing
\qand Enter. -
Verify the cluster is initialized with one node:
gitlab-ctl repmgr cluster showThe output should be similar to the following:
Role | Name | Upstream | Connection String ----------+----------|----------|---------------------------------------- * master | HOSTNAME | | host=HOSTNAME user=gitlab_repmgr dbname=gitlab_repmgr -
Note down the hostname or IP address in the connection string:
host=HOSTNAME. We will refer to the hostname in the next section asMASTER_NODE_NAME. If the value is not an IP address, it will need to be a resolvable name (via DNS or/etc/hosts)
Secondary nodes
-
Set up the repmgr standby:
gitlab-ctl repmgr standby setup MASTER_NODE_NAMEDo note that this will remove the existing data on the node. The command has a wait time.
The output should be similar to the following:
# gitlab-ctl repmgr standby setup MASTER_NODE_NAME Doing this will delete the entire contents of /var/opt/gitlab/postgresql/data If this is not what you want, hit Ctrl-C now to exit To skip waiting, rerun with the -w option Sleeping for 30 seconds Stopping the database Removing the data Cloning the data Starting the database Registering the node with the cluster ok: run: repmgrd: (pid 19068) 0s -
Verify the node now appears in the cluster:
gitlab-ctl repmgr cluster showThe output should be similar to the following:
Role      | Name    | Upstream  | Connection String
----------+---------|-----------|------------------------------------------------
* master  | MASTER  |           | host=MASTER_NODE_NAME user=gitlab_repmgr dbname=gitlab_repmgr
  standby | STANDBY | MASTER    | host=STANDBY_HOSTNAME user=gitlab_repmgr dbname=gitlab_repmgr
Repeat the above steps on all secondary nodes.
Database checkpoint
Before moving on, make sure the databases are configured correctly. Run the following command on the primary node to verify that replication is working properly:
gitlab-ctl repmgr cluster showThe output should be similar to:
Role      | Name         | Upstream     | Connection String
----------+--------------|--------------|--------------------------------------------------------------------
* master  | MASTER  |        | host=MASTER port=5432 user=gitlab_repmgr dbname=gitlab_repmgr
  standby | STANDBY | MASTER | host=STANDBY port=5432 user=gitlab_repmgr dbname=gitlab_repmgr
If the 'Role' column for any node says "FAILED", check the Troubleshooting section before proceeding.
Also, check that the check master command works successfully on each node:
su - gitlab-consul
gitlab-ctl repmgr-check-master || echo 'This node is a standby repmgr node'
This command relies on exit codes to tell Consul whether a particular node is a master
or secondary. The most important thing here is that this command does not produce errors.
If there are errors it's most likely due to incorrect gitlab-consul database user permissions.
Check the Troubleshooting section before proceeding.
Repmgr failover procedure
By default, if the master database fails, repmgrd should promote one of the
standby nodes to master automatically, and Consul will update PgBouncer with
the new master.
If you need to failover manually, you have two options:
Shutdown the current master database
Run:
gitlab-ctl stop postgresqlThe automated failover process will see this and failover to one of the standby nodes.
Or perform a manual failover
-
Ensure the old master node is not still active.
-
Login to the server that should become the new master and run:
gitlab-ctl repmgr standby promote -
If there are any other standby servers in the cluster, have them follow the new master server:
gitlab-ctl repmgr standby follow NEW_MASTER
Geo secondary site considerations
When a Geo secondary site is replicating from a primary site that uses repmgr and PgBouncer, replicating through PgBouncer is not supported and the secondary must replicate directly from the leader node in the repmgr cluster. Therefore, when there is a failover in the repmgr cluster, you will need to manually re-point your secondary site to replicate from the new leader with:
sudo gitlab-ctl replicate-geo-database --host=<new_leader_ip> --replication-slot=<slot_name>Otherwise, the replication will not happen anymore, even if the original node gets re-added as a follower node. This will re-sync your secondary site database and may take a long time depending on the amount of data to sync. You may also need to run gitlab-ctl reconfigure if replication is still not working after re-syncing.
Repmgr Restore procedure
If a node fails, it can be removed from the cluster, or added back as a standby after it has been restored to service.
Remove a standby from the cluster
From any other node in the cluster, run:
gitlab-ctl repmgr standby unregister --node=Xwhere X is the value of node in repmgr.conf on the old server.
To find this, you can use:
awk -F = '$1 == "node" { print $2 }' /var/opt/gitlab/postgresql/repmgr.confIt will output something like:
959789412Then you will use this ID to unregister the node:
gitlab-ctl repmgr standby unregister --node=959789412Add a node as a standby server
From the standby node, run:
gitlab-ctl repmgr standby follow NEW_MASTER
gitlab-ctl restart repmgrd
WARNING:
When the server is brought back online, and before
you switch it to a standby node, repmgr will report that there are two masters.
If there are any clients that are still attempting to write to the old master,
this will cause a split, and the old master will need to be resynced from
scratch by performing a gitlab-ctl repmgr standby setup NEW_MASTER.
Add a failed master back into the cluster as a standby node
Once repmgrd and PostgreSQL are running, the node will need to follow the new
as a standby node.
gitlab-ctl repmgr standby follow NEW_MASTEROnce the node is following the new master as a standby, the node needs to be unregistered from the cluster on the new master node.
Once the old master node has been unregistered from the cluster, it will need to be setup as a new standby:
gitlab-ctl repmgr standby setup NEW_MASTERFailure to unregister and read the old master node can lead to subsequent failovers not working.
Alternate configurations
Database authorization
By default, we give any host on the database network the permission to perform
repmgr operations using PostgreSQL's trust method. If you do not want this
level of trust, there are alternatives.
You can trust only the specific nodes that will be database clusters, or you can require md5 authentication.
Trust specific addresses
If you know the IP address, or FQDN of all database and PgBouncer nodes in the cluster, you can trust only those nodes.
In /etc/gitlab/gitlab.rb on all of the database nodes, set
repmgr['trust_auth_cidr_addresses'] to an array of strings containing all of
the addresses.
If setting to a node's FQDN, they must have a corresponding PTR record in DNS.
If setting to a node's IP address, specify it as XXX.XXX.XXX.XXX/32.
For example:
repmgr['trust_auth_cidr_addresses'] = %w(192.168.1.44/32 db2.example.com)MD5 Authentication
If you are running on an untrusted network, repmgr can use md5 authentication
with a .pgpass file
to authenticate.
You can specify by IP address, FQDN, or by subnet, using the same format as in the previous section:
-
On the current master node, create a password for the
gitlabandgitlab_repmgruser:gitlab-psql -d template1 template1=# \password gitlab_repmgr Enter password: **** Confirm password: **** template1=# \password gitlab -
On each database node:
-
Edit
/etc/gitlab/gitlab.rb:- Ensure
repmgr['trust_auth_cidr_addresses']is not set - Set
postgresql['md5_auth_cidr_addresses']to the desired value - Set
postgresql['sql_replication_user'] = 'gitlab_repmgr' - Reconfigure with
gitlab-ctl reconfigure - Restart PostgreSQL with
gitlab-ctl restart postgresql
- Ensure
-
Create a
.pgpassfile. Enter thegitlab_repmgrpassword twice to when asked:gitlab-ctl write-pgpass --user gitlab_repmgr --hostuser gitlab-psql --database '*'
-
-
On each PgBouncer node, edit
/etc/gitlab/gitlab.rb:- Ensure
gitlab_rails['db_password']is set to the plaintext password for thegitlabdatabase user - Reconfigure GitLab for the changes to take effect
- Ensure
Troubleshooting
Consul and PostgreSQL changes not taking effect
Due to the potential impacts, gitlab-ctl reconfigure only reloads Consul and PostgreSQL, it will not restart the services. However, not all changes can be activated by reloading.
To restart either service, run gitlab-ctl restart SERVICE
For PostgreSQL, it is usually safe to restart the master node by default. Automatic failover defaults to a 1 minute timeout. Provided the database returns before then, nothing else needs to be done. To be safe, you can stop repmgrd on the standby nodes first with gitlab-ctl stop repmgrd, then start afterwards with gitlab-ctl start repmgrd.
On the Consul server nodes, it is important to restart the Consul service in a controlled manner.
gitlab-ctl repmgr-check-master command produces errors
If this command displays errors about database permissions it is likely that something failed during
install, resulting in the gitlab-consul database user getting incorrect permissions. Follow these
steps to fix the problem:
- On the master database node, connect to the database prompt -
gitlab-psql -d template1 - Delete the
gitlab-consuluser -DROP USER "gitlab-consul"; - Exit the database prompt -
\q - Reconfigure GitLab and the user will be re-added with the proper permissions.
- Change to the
gitlab-consuluser -su - gitlab-consul - Try the check command again -
gitlab-ctl repmgr-check-master.
Now there should not be errors. If errors still occur then there is another problem.
PgBouncer error ERROR: pgbouncer cannot connect to server
You may get this error when running gitlab-rake gitlab:db:configure or you
may see the error in the PgBouncer log file.
PG::ConnectionBad: ERROR: pgbouncer cannot connect to serverThe problem may be that your PgBouncer node's IP address is not included in the
trust_auth_cidr_addresses setting in /etc/gitlab/gitlab.rb on the database nodes.
You can confirm that this is the issue by checking the PostgreSQL log on the master
database node. If you see the following error then trust_auth_cidr_addresses
is the problem.
2018-03-29_13:59:12.11776 FATAL: no pg_hba.conf entry for host "123.123.123.123", user "pgbouncer", database "gitlabhq_production", SSL offTo fix the problem, add the IP address to /etc/gitlab/gitlab.rb.
postgresql['trust_auth_cidr_addresses'] = %w(123.123.123.123/32 <other_cidrs>)Reconfigure GitLab for the changes to take effect.
Issues with other components
If you're running into an issue with a component not outlined here, be sure to check the troubleshooting section of their specific documentation page: