Environments and deployments
Introduced in GitLab 8.9.
Environments allow control of the continuous deployment of your software, all within GitLab.
Introduction
There are many stages required in the software development process before the software is ready for public consumption.
For example:
- Develop your code.
- Test your code.
- Deploy your code into a testing or staging environment before you release it to the public.
This helps find bugs in your software, and also in the deployment process as well.
GitLab CI/CD is capable of not only testing or building your projects, but also deploying them in your infrastructure, with the added benefit of giving you a way to track your deployments. In other words, you always know what is currently being deployed or has been deployed on your servers.
It's important to know that:
- Environments are like tags for your CI jobs, describing where code gets deployed.
- Deployments are created when GitLab CI/CD is used to deploy versions of code to environments.
GitLab:
- Provides a full history of your deployments for each environment.
- Keeps track of your deployments, so you always know what is currently being deployed on your servers.
If you have a deployment service such as Kubernetes associated with your project, you can use it to assist with your deployments, and can even access a web terminal for your environment from within GitLab!
Configuring environments
Configuring environments involves:
- Understanding how pipelines work.
- Defining environments in your project's
.gitlab-ci.ymlfile. - Creating a job configured to deploy your application. For example, a deploy job configured with
environmentto deploy your application to a Kubernetes cluster.
The rest of this section illustrates how to configure environments and deployments using an example scenario. It assumes you have already:
In the scenario:
- We are developing an application.
- We want to run tests and build our app on all branches.
- Our default branch is
master. - We deploy the app only when a pipeline on
masterbranch is run.
Defining environments
Let's consider the following .gitlab-ci.yml example:
stages:
  - test
  - build
  - deploy

test:
  stage: test
  script: echo "Running tests"

build:
  stage: build
  script: echo "Building the app"

deploy_staging:
  stage: deploy
  script:
    - echo "Deploy to staging server"
  environment:
    name: staging
    url: https://staging.example.com
  only:
    - master
We have defined three stages:
testbuilddeploy
The jobs assigned to these stages run in this order. If any job fails, then the pipeline fails and jobs that are assigned to the next stage don't run.
In our case:
- The
testjob runs first. - Then the
buildjob. - Lastly the
deploy_stagingjob.
With this configuration, we:
- Check that the tests pass.
- Ensure that our app is able to be built successfully.
- Lastly we deploy to the staging server.
Note that the environment keyword defines where the app is deployed. The environment name and
url is exposed in various places within GitLab. Each time a job that has an environment specified
succeeds, a deployment is recorded along with the Git SHA and environment name.
WARNING:
Some characters are not allowed in environment names. Use only letters,
numbers, spaces, and -, _, /, {, }, or .. Also, it must not start nor end with /.
In summary, with the above .gitlab-ci.yml we have achieved the following:
- All branches run the
testandbuildjobs. - The
deploy_stagingjob runs only on themasterbranch, which means all merge requests that are created from branches don't get deployed to the staging server. - When a merge request is merged, all jobs run and the
deploy_stagingjob deploys our code to a staging server while the deployment is recorded in an environment namedstaging.
Environment variables and runners
Starting with GitLab 8.15, the environment name is exposed to the runner in two forms:
-
$CI_ENVIRONMENT_NAME. The name given in.gitlab-ci.yml(with any variables expanded). -
$CI_ENVIRONMENT_SLUG. A "cleaned-up" version of the name, suitable for use in URLs, DNS, etc.
If you change the name of an existing environment, the:
-
$CI_ENVIRONMENT_NAMEvariable is updated with the new environment name. -
$CI_ENVIRONMENT_SLUGvariable remains unchanged to prevent unintended side effects.
Starting with GitLab 9.3, the environment URL is exposed to the runner via
$CI_ENVIRONMENT_URL. The URL is expanded from either:
-
.gitlab-ci.yml. - The external URL from the environment if not defined in
.gitlab-ci.yml.
Set dynamic environment URLs after a job finishes
Introduced in GitLab 12.9.
In a job script, you can specify a static environment URL.
However, there may be times when you want a dynamic URL. For example,
if you deploy a Review App to an external hosting
service that generates a random URL per deployment, like https://94dd65b.amazonaws.com/qa-lambda-1234567,
you don't know the URL before the deployment script finishes.
If you want to use the environment URL in GitLab, you would have to update it manually.
To address this problem, you can configure a deployment job to report back a set of
variables, including the URL that was dynamically-generated by the external service.
GitLab supports the dotenv (.env) file format,
and expands the environment:url value with variables defined in the .env file.
To use this feature, specify the
artifacts:reports:dotenv keyword in .gitlab-ci.yml.
For an overview, see Set dynamic URLs after a job finished.
Example of setting dynamic environment URLs
The following example shows a Review App that creates a new environment
per merge request. The review job is triggered by every push, and
creates or updates an environment named review/your-branch-name.
The environment URL is set to $DYNAMIC_ENVIRONMENT_URL:
review:
  script:
    - DYNAMIC_ENVIRONMENT_URL=$(deploy-script)                                 # In script, get the environment URL.
    - echo "DYNAMIC_ENVIRONMENT_URL=$DYNAMIC_ENVIRONMENT_URL" >> deploy.env    # Add the value to a dotenv file.
  artifacts:
    reports:
      dotenv: deploy.env                                                       # Report back dotenv file to rails.
  environment:
    name: review/$CI_COMMIT_REF_SLUG
    url: $DYNAMIC_ENVIRONMENT_URL                                              # and set the variable produced in script to `environment:url`
    on_stop: stop_review

stop_review:
  script:
    - ./teardown-environment
  when: manual
  environment:
    name: review/$CI_COMMIT_REF_SLUG
    action: stop
As soon as the review job finishes, GitLab updates the review/your-branch-name
environment's URL.
It parses the deploy.env report artifact, registers a list of variables as runtime-created,
uses it for expanding environment:url: $DYNAMIC_ENVIRONMENT_URL and sets it to the environment URL.
You can also specify a static part of the URL at environment:url:, such as
https://$DYNAMIC_ENVIRONMENT_URL. If the value of DYNAMIC_ENVIRONMENT_URL is
example.com, the final result is https://example.com.
The assigned URL for the review/your-branch-name environment is visible in the UI.
Note the following:
-
stop_reviewdoesn't generate a dotenv report artifact, so it doesn't recognize theDYNAMIC_ENVIRONMENT_URLvariable. Therefore you shouldn't setenvironment:url:in thestop_reviewjob. - If the environment URL isn't valid (for example, the URL is malformed), the system doesn't update the environment URL.
- If the script that runs in
stop_reviewexists only in your repository and therefore can't useGIT_STRATEGY: none, configure pipelines for merge requests for these jobs. This ensures that runners can fetch the repository even after a feature branch is deleted. For more information, see Ref Specs for Runners.
Configuring manual deployments
Adding when: manual to an automatically executed job's configuration converts it to
a job requiring manual action.
To expand on the previous example, the following includes
another job that deploys our app to a production server and is
tracked by a production environment.
The .gitlab-ci.yml file for this is as follows:
stages:
  - test
  - build
  - deploy

test:
  stage: test
  script: echo "Running tests"

build:
  stage: build
  script: echo "Building the app"

deploy_staging:
  stage: deploy
  script:
    - echo "Deploy to staging server"
  environment:
    name: staging
    url: https://staging.example.com
  only:
    - master

deploy_prod:
  stage: deploy
  script:
    - echo "Deploy to production server"
  environment:
    name: production
    url: https://example.com
  when: manual
  only:
    - master
The when: manual action:
- Exposes a "play" button in the GitLab UI for that job.
- Means the
deploy_prodjob is only triggered when the "play" button is clicked.
You can find the "play" button in the pipelines, environments, deployments, and jobs views.
| View | Screenshot |
|---|---|
| Pipelines |  |
| Single pipeline |  |
| Environments | 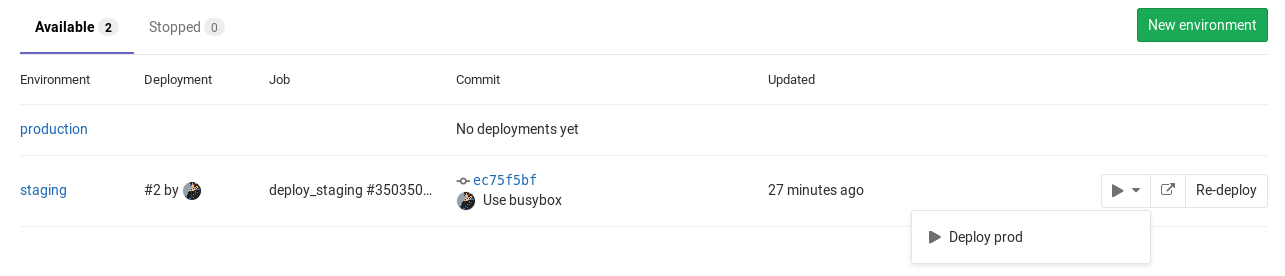 |
| Deployments |  |
| Jobs |  |
Clicking the play button in any view triggers the deploy_prod job. The deployment is recorded as a
new environment named production.
If your environment's name is production (all lowercase), it's recorded in
Value Stream Analytics.
Configuring dynamic environments
Regular environments are good when deploying to "stable" environments like staging or production.
However, for environments for branches other than master, dynamic environments
can be used. Dynamic environments make it possible to create environments on the fly by
declaring their names dynamically in .gitlab-ci.yml.
Dynamic environments are a fundamental part of Review apps.
Allowed variables
The name and url keywords for dynamic environments can use most available CI/CD variables,
including:
However, you cannot use variables defined:
- Under
script. - On the runner's side.
There are also other variables that are unsupported in the context of environment:name.
For more information, see Where variables can be used.
Example configuration
Runners expose various environment variables when a job runs, so you can use them as environment names.
In the following example, the job deploys to all branches except master:
deploy_review:
  stage: deploy
  script:
    - echo "Deploy a review app"
  environment:
    name: review/$CI_COMMIT_REF_NAME
    url: https://$CI_ENVIRONMENT_SLUG.example.com
  only:
    - branches
  except:
    - master
In this example:
- The job's name is
deploy_reviewand it runs on thedeploystage. - We set the
environmentwith theenvironment:nameasreview/$CI_COMMIT_REF_NAME. Since the environment name can contain slashes (/), we can use this pattern to distinguish between dynamic and regular environments. - We tell the job to run
onlyon branches,exceptmaster.
For the value of:
-
environment:name, the first part isreview, followed by a/and then$CI_COMMIT_REF_NAME, which receives the value of the branch name. -
environment:url, we want a specific and distinct URL for each branch.$CI_COMMIT_REF_NAMEmay contain a/or other characters that would be invalid in a domain name or URL, so we use$CI_ENVIRONMENT_SLUGto guarantee that we get a valid URL.For example, given a
$CI_COMMIT_REF_NAMEof100-Do-The-Thing, the URL is something likehttps://100-do-the-4f99a2.example.com. Again, the way you set up the web server to serve these requests is based on your setup.We have used
$CI_ENVIRONMENT_SLUGhere because it is guaranteed to be unique. If you're using a workflow like GitLab Flow, collisions are unlikely and you may prefer environment names to be more closely based on the branch name. In that case, you could use$CI_COMMIT_REF_NAMEinenvironment:urlin the example above:https://$CI_COMMIT_REF_NAME.example.com, which would give a URL ofhttps://100-do-the-thing.example.com.
You aren't required to use the same prefix or only slashes (/) in the dynamic environments' names.
However, using this format enables the grouping similar environments
feature.
Configuring Kubernetes deployments
Introduced in GitLab 12.6.
If you are deploying to a Kubernetes cluster
associated with your project, you can configure these deployments from your
gitlab-ci.yml file.
NOTE: Kubernetes configuration isn't supported for Kubernetes clusters that are managed by GitLab. To follow progress on support for GitLab-managed clusters, see the relevant issue.
The following configuration options are supported:
In the following example, the job deploys your application to the
production Kubernetes namespace.
deploy:
  stage: deploy
  script:
    - echo "Deploy to production server"
  environment:
    name: production
    url: https://example.com
    kubernetes:
      namespace: production
  only:
    - master
When deploying to a Kubernetes cluster using the GitLab Kubernetes integration, information about the cluster and namespace is displayed above the job trace on the deployment job page:

Configuring incremental rollouts
Learn how to release production changes to only a portion of your Kubernetes pods with incremental rollouts.
Deployment safety
Deployment jobs can be more sensitive than other jobs in a pipeline, and might need to be treated with an extra care. There are multiple features in GitLab that helps maintain deployment security and stability.
- Restrict write-access to a critical environment
- Limit the job-concurrency for deployment jobs
- Skip outdated deployment jobs
- Prevent deployments during deploy freeze windows
Complete example
The configuration in this section provides a full development workflow where your app is:
- Tested.
- Built.
- Deployed as a Review App.
- Deployed to a staging server after the merge request is merged.
- Finally, able to be manually deployed to the production server.
The following combines the previous configuration examples, including:
- Defining simple environments for testing, building, and deployment to staging.
- Adding manual actions for deployment to production.
- Creating dynamic environments for deployments for reviewing.
stages:
  - test
  - build
  - deploy

test:
  stage: test
  script: echo "Running tests"

build:
  stage: build
  script: echo "Building the app"

deploy_review:
  stage: deploy
  script:
    - echo "Deploy a review app"
  environment:
    name: review/$CI_COMMIT_REF_NAME
    url: https://$CI_ENVIRONMENT_SLUG.example.com
  only:
    - branches
  except:
    - master

deploy_staging:
  stage: deploy
  script:
    - echo "Deploy to staging server"
  environment:
    name: staging
    url: https://staging.example.com
  only:
    - master

deploy_prod:
  stage: deploy
  script:
    - echo "Deploy to production server"
  environment:
    name: production
    url: https://example.com
  when: manual
  only:
    - master
A more realistic example would also include copying files to a location where a webserver (for example, NGINX) could then access and serve them.
The example below copies the public directory to /srv/nginx/$CI_COMMIT_REF_SLUG/public:
review_app:
  stage: deploy
  script:
    - rsync -av --delete public /srv/nginx/$CI_COMMIT_REF_SLUG
  environment:
    name: review/$CI_COMMIT_REF_NAME
    url: https://$CI_COMMIT_REF_SLUG.example.com
This example requires that NGINX and GitLab Runner are set up on the server this job runs on.
See the limitations section for some edge cases regarding the naming of your branches and Review Apps.
The complete example provides the following workflow to developers:
- Create a branch locally.
- Make changes and commit them.
- Push the branch to GitLab.
- Create a merge request.
Behind the scenes, the runner:
- Picks up the changes and starts running the jobs.
- Runs the jobs sequentially as defined in
stages:- First, run the tests.
- If the tests succeed, build the app.
- If the build succeeds, the app is deployed to an environment with a name specific to the branch.
So now, every branch:
- Gets its own environment.
- Is deployed to its own unique location, with the added benefit of:
- Having a history of deployments.
- Being able to rollback changes if needed.
For more information, see Using the environment URL.
Protected environments
Environments can be "protected", restricting access to them.
For more information, see Protected environments.
Working with environments
Once environments are configured, GitLab provides many features for working with them, as documented below.
Viewing environments and deployments
A list of environments and deployment statuses is available on each project's Operations > Environments page.
For example:

This example shows:
- The environment's name with a link to its deployments.
- The last deployment ID number and who performed it.
- The job ID of the last deployment with its respective job name.
- The commit information of the last deployment, such as who committed it, to what branch, and the Git SHA of the commit.
- The exact time the last deployment was performed.
- The upcoming deployment, if a deployment for the environment is in progress.
- When the environment stops automatically.
- A button that takes you to the URL that you defined under the
environmentkeyword in.gitlab-ci.yml. - A number of deployment actions, including:
- Prevent the environment from stopping automatically.
- Open the live environment.
- Trigger a manual deployment to a different environment.
- Retry the deployment.
- Stop the environment.
The information shown in the Environments page is limited to the latest deployments, but an environment can have multiple deployments.
Notes:
- While you can create environments manually in the web interface, we recommend that you define your environments in
.gitlab-ci.ymlfirst. They will be automatically created for you after the first deploy.- The environments page can only be viewed by users with Reporter permission and above. For more information on permissions, see the permissions documentation.
- Only deploys that happen after your
.gitlab-ci.ymlis properly configured show up in the Environment and Last deployment lists.
Viewing deployment history
GitLab keeps track of your deployments, so you:
- Always know what is currently being deployed on your servers.
- Can have the full history of your deployments for every environment.
Clicking on an environment shows the history of its deployments. Here's an example Environments page with multiple deployments:

This view is similar to the Environments page, but all deployments are shown. Also in this view is a Rollback button. For more information, see Retrying and rolling back.
Retrying and rolling back
If there is a problem with a deployment, you can retry it or roll it back.
To retry or rollback a deployment:
- Navigate to Operations > Environments.
- Click on the environment.
- In the deployment history list for the environment, click the:
- Retry button next to the last deployment, to retry that deployment.
- Rollback button next to a previously successful deployment, to roll back to that deployment.
What to expect with a rollback
Pressing the Rollback button on a specific commit triggers a new deployment with its own unique job ID. This new deployment points to the commit you're rolling back to.
Note that the defined deployment process in the job's script determines whether the rollback
succeeds.
Using the environment URL
The environment URL is exposed in a few places within GitLab:
- In a merge request widget as a link:

- In the Environments view as a button:
- In the Deployments view as a button:
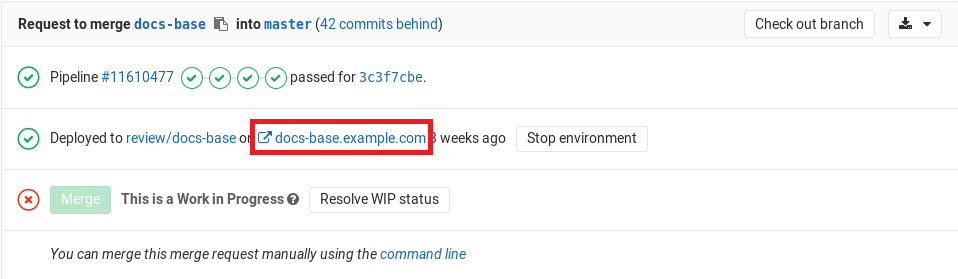
You can see this information in a merge request itself if:
- The merge request is eventually merged to the default branch (usually
master). - That branch also deploys to an environment (for example,
stagingorproduction).
For example:

Going from source files to public pages
With GitLab Route Maps, you can go directly from source files to public pages in the environment set for Review Apps.
Stopping an environment
Stopping an environment:
- Moves it from the list of Available environments to the list of Stopped environments on the Environments page.
- Executes an
on_stopaction, if defined.
This is often used when multiple developers are working on a project at the same time, each of them pushing to their own branches, causing many dynamic environments to be created.
Starting with GitLab 8.14, dynamic environments stop automatically when their associated branch is deleted.
Automatically stopping an environment
Environments can be stopped automatically using special configuration.
Consider the following example where the deploy_review job calls stop_review
to clean up and stop the environment:
deploy_review:
  stage: deploy
  script:
    - echo "Deploy a review app"
  environment:
    name: review/$CI_COMMIT_REF_NAME
    url: https://$CI_ENVIRONMENT_SLUG.example.com
    on_stop: stop_review
  rules:
    - if: $CI_MERGE_REQUEST_ID

stop_review:
  stage: deploy
  script:
    - echo "Remove review app"
  environment:
    name: review/$CI_COMMIT_REF_NAME
    action: stop
  rules:
    - if: $CI_MERGE_REQUEST_ID
      when: manual
If you can't use Pipelines for merge requests,
setting the GIT_STRATEGY to none is necessary in the
stop_review job so that the runner doesn't
try to check out the code after the branch is deleted.
When you have an environment that has a stop action defined (typically when
the environment describes a Review App), GitLab automatically triggers a
stop action when the associated branch is deleted. The stop_review job must
be in the same stage as the deploy_review job in order for the environment
to automatically stop.
Additionally, both jobs should have matching rules
or only/except configuration. In the example
above, if the configuration isn't identical, the stop_review job might not be
included in all pipelines that include the deploy_review job, and it isn't
possible to trigger action: stop to stop the environment automatically.
You can read more in the .gitlab-ci.yml reference.
Environments auto-stop
Introduced in GitLab 12.8.
You can set an expiry time for environments and stop them automatically after a certain period.
For example, consider the use of this feature with Review App environments. When you set up Review Apps, sometimes they keep running for a long time because some merge requests are left open and forgotten. Such idle environments waste resources and should be terminated as soon as possible.
To address this problem, you can specify an optional expiration date for Review App environments. When the expiry time is reached, GitLab automatically triggers a job to stop the environment, eliminating the need of manually doing so. In case an environment is updated, the expiration is renewed ensuring that only active merge requests keep running Review Apps.
To enable this feature, you must specify the environment:auto_stop_in
keyword in .gitlab-ci.yml. You can specify a human-friendly date as the value, such as
1 hour and 30 minutes or 1 day. auto_stop_in uses the same format of
artifacts:expire_in docs.
Note that due to resource limitation, a background worker for stopping environments only runs once every hour. This means that environments aren't stopped at the exact timestamp specified, but are instead stopped when the hourly cron worker detects expired environments.
Auto-stop example
In the following example, there is a basic review app setup that creates a new environment
per merge request. The review_app job is triggered by every push and
creates or updates an environment named review/your-branch-name.
The environment keeps running until stop_review_app is executed:
review_app:
  script: deploy-review-app
  environment:
    name: review/$CI_COMMIT_REF_NAME
    on_stop: stop_review_app
    auto_stop_in: 1 week
  rules:
    - if: $CI_MERGE_REQUEST_ID

stop_review_app:
  script: stop-review-app
  environment:
    name: review/$CI_COMMIT_REF_NAME
    action: stop
  rules:
    - if: $CI_MERGE_REQUEST_ID
      when: manual
As long as a merge request is active and keeps getting new commits, the review app doesn't stop, so developers don't need to worry about re-initiating review app.
On the other hand, since stop_review_app is set to auto_stop_in: 1 week,
if a merge request becomes inactive for more than a week,
GitLab automatically triggers the stop_review_app job to stop the environment.
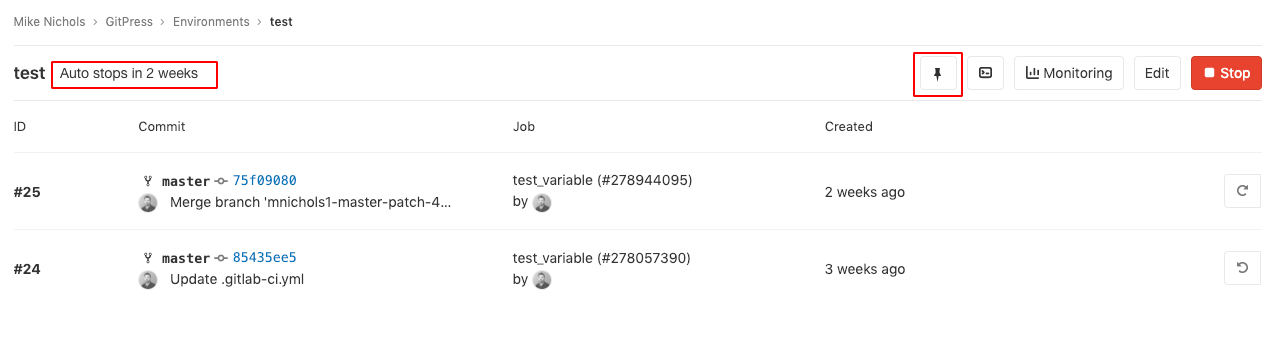
You can also check the expiration date of environments through the GitLab UI. To do so,
go to Operations > Environments > Environment. You can see the auto-stop period
at the left-top section and a pin-mark button at the right-top section. This pin-mark
button can be used to prevent auto-stopping the environment. By clicking this button, the
auto_stop_in setting is overwritten and the environment is active until it's stopped manually.
Delete a stopped environment
Introduced in GitLab 12.10.
You can delete stopped environments in one of two ways: through the GitLab UI or through the API.
Delete environments through the UI
To view the list of Stopped environments, navigate to Operations > Environments and click the Stopped tab.
From there, you can click the Delete button directly, or you can click the environment name to see its details and Delete it from there.
You can also delete environments by viewing the details for a stopped environment:
- Navigate to Operations > Environments.
- Click on the name of an environment within the Stopped environments list.
- Click on the Delete button that appears at the top for all stopped environments.
- Finally, confirm your chosen environment in the modal that appears to delete it.
Delete environments through the API
Environments can also be deleted by using the Environments API.
Prepare an environment
Introduced in GitLab 13.2.
By default, GitLab creates a deployment every time a build with the specified environment runs. Newer deployments can also cancel older ones.
You may want to specify an environment keyword to
protect builds from unauthorized access, or to get
access to scoped variables. In these cases,
you can use the action: prepare keyword to ensure deployments aren't created,
and no builds are canceled:
build:
stage: build
script:
- echo "Building the app"
environment:
name: staging
action: prepare
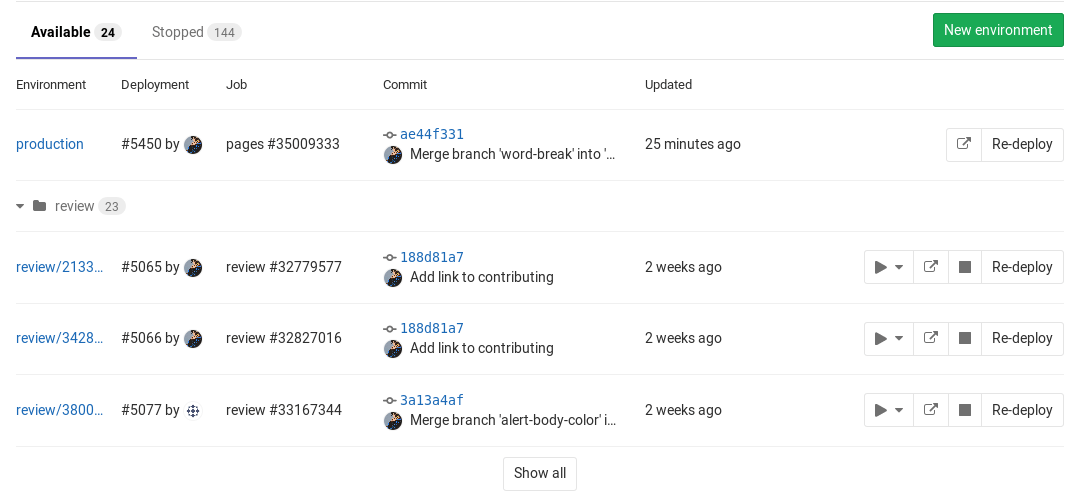
url: https://staging.example.comGrouping similar environments
Introduced in GitLab 8.14.
As documented in Configuring dynamic environments, you can
prepend environment name with a word, followed by a /, and finally the branch
name, which is automatically defined by the CI_COMMIT_REF_NAME variable.
In short, environments that are named like type/foo are all presented under the same
group, named type.
In our minimal example, we named the environments review/$CI_COMMIT_REF_NAME
where $CI_COMMIT_REF_NAME is the branch name. Here is a snippet of the example:
deploy_review:
  stage: deploy
  script:
    - echo "Deploy a review app"
  environment:
    name: review/$CI_COMMIT_REF_NAME
In this case, if you visit the Environments page and the branches exist, you should see something like:
Environment incident management
You have successfully setup a Continuous Delivery/Deployment workflow in your project. Production environments can go down unexpectedly, including for reasons outside of your own control. For example, issues with external dependencies, infrastructure, or human error can cause major issues with an environment. This could include:
- A dependent cloud service goes down.
- A 3rd party library is updated and it's not compatible with your application.
- Someone performs a DDoS attack to a vulnerable endpoint in your server.
- An operator misconfigures infrastructure.
- A bug is introduced into the production application code.
You can use incident management to get alerts when there are critical issues that need immediate attention.
View the latest alerts for environments (ULTIMATE)
Introduced in GitLab Ultimate 13.4.
If you set up alerts for Prometheus metrics, alerts for environments are shown on the environments page. The alert with the highest severity is shown, so you can identify which environments need immediate attention.

When the issue that triggered the alert is resolved, it is removed and is no longer visible on the environment page.
If the alert requires a rollback, you can select the deployment tab from the environment page and select which deployment to roll back to.
Auto Rollback (ULTIMATE)
Introduced in GitLab Ultimate 13.7.
In a typical Continuous Deployment workflow, the CI pipeline tests every commit before deploying to production. However, problematic code can still make it to production. For example, inefficient code that is logically correct can pass tests even though it causes severe performance degradation. Operators and SREs monitor the system to catch such problems as soon as possible. If they find a problematic deployment, they can roll back to a previous stable version.
GitLab Auto Rollback eases this workflow by automatically triggering a rollback when a critical alert is detected. GitLab selects and redeploys the most recent successful deployment.
Limitations of GitLab Auto Rollback:
- The rollback is skipped if a deployment is running when the alert is detected.
- A rollback can happen only once in three minutes. If multiple alerts are detected at once, only one rollback is performed.
GitLab Auto Rollback is turned off by default. To turn it on:
- Visit Project > Settings > CI/CD > Automatic deployment rollbacks.
- Select the checkbox for Enable automatic rollbacks.
- Click Save changes.
Monitoring environments
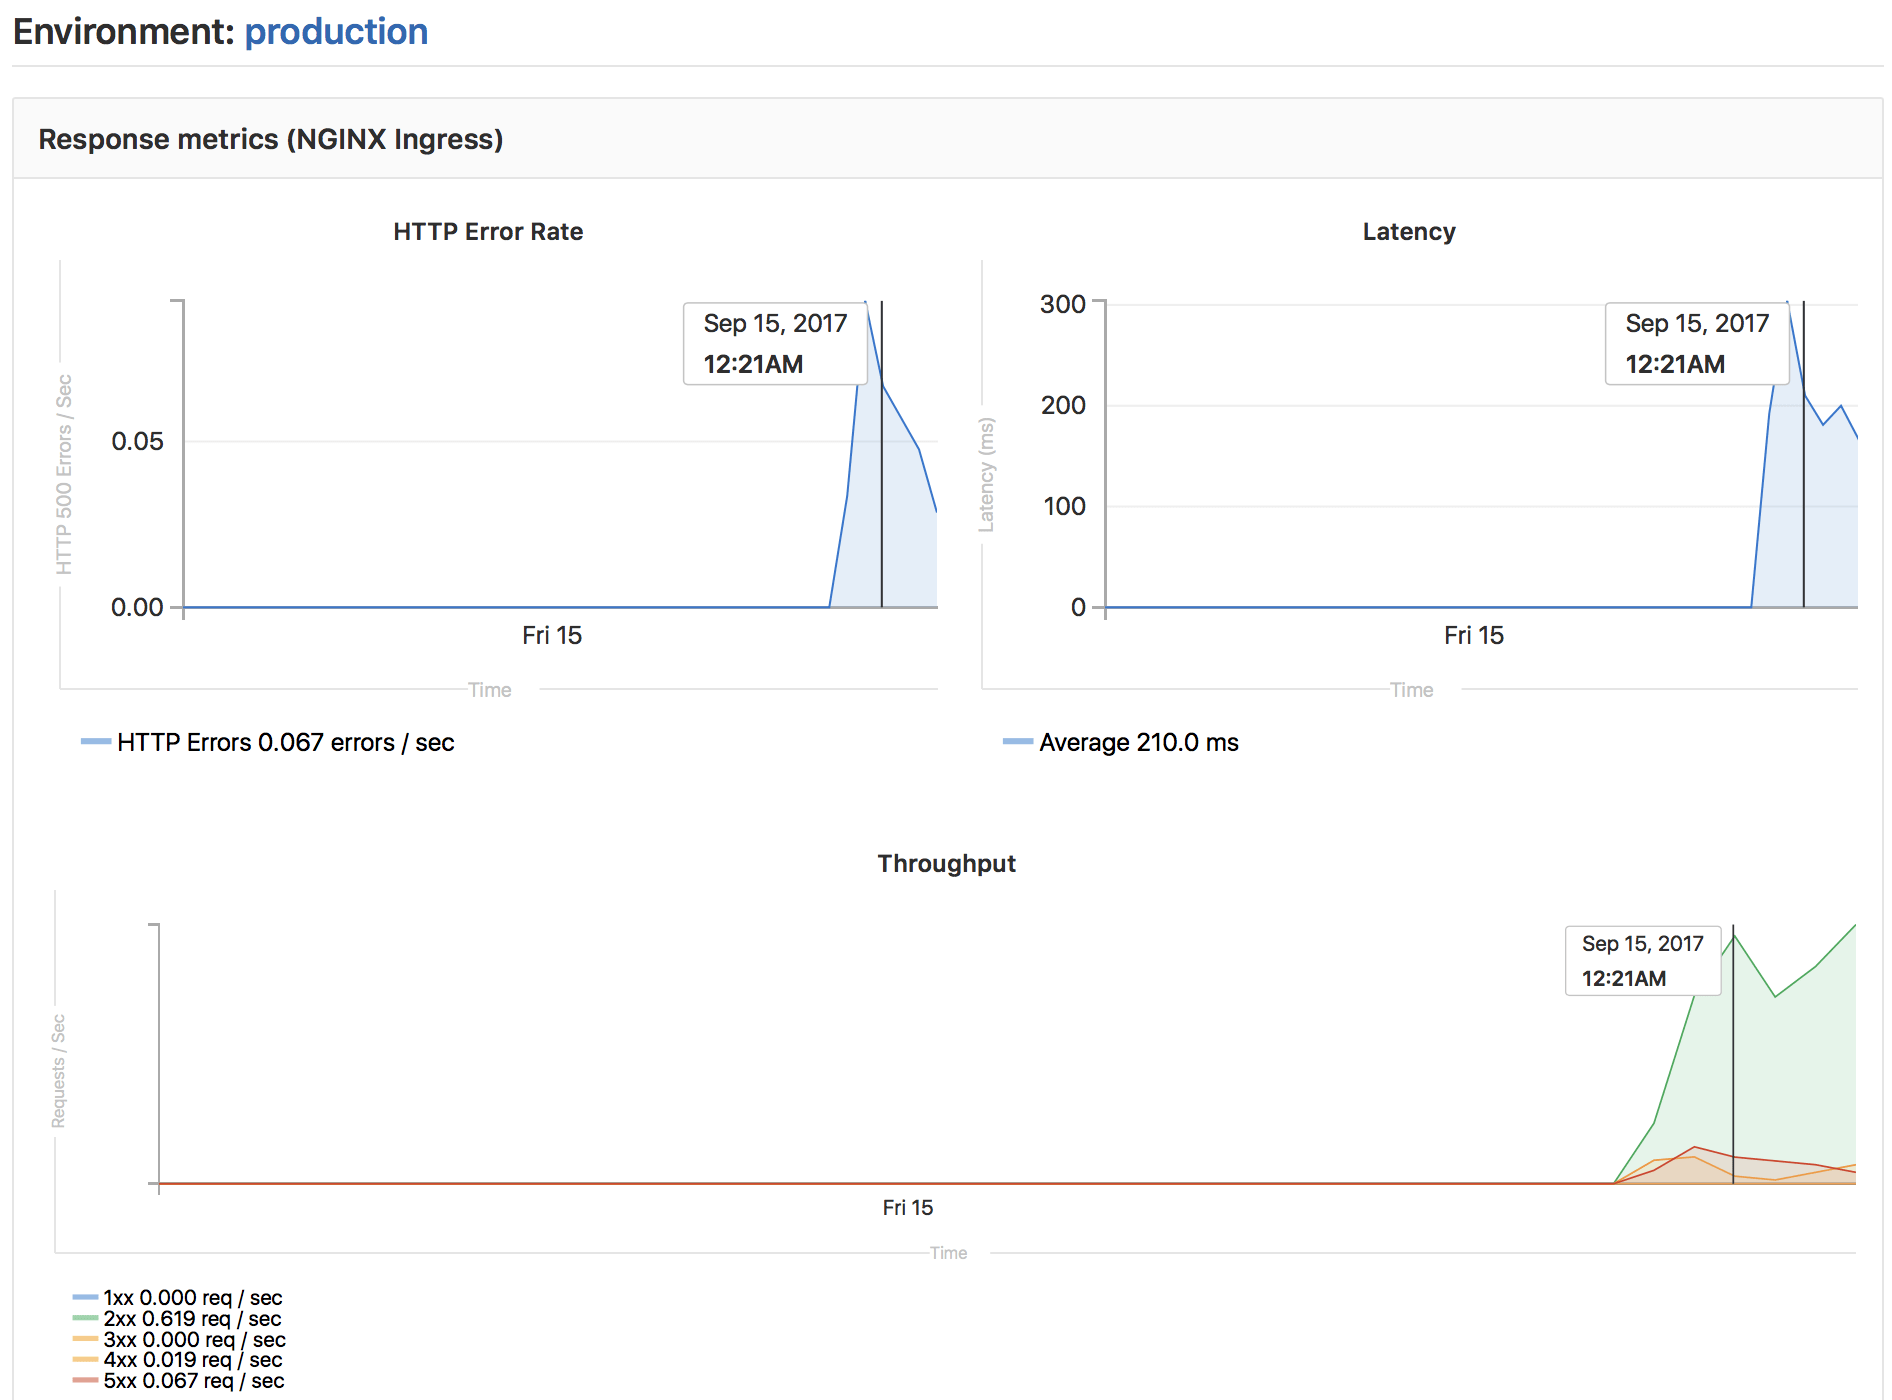
If you have enabled Prometheus for monitoring system and response metrics, you can monitor the behavior of your app running in each environment. For the monitoring dashboard to appear, you need to Configure Prometheus to collect at least one supported metric.
In GitLab 9.2 and later, all deployments to an environment are shown directly on the monitoring dashboard.
Once configured, GitLab attempts to retrieve supported performance metrics for any environment that has had a successful deployment. If monitoring data was successfully retrieved, a Monitoring button appears for each environment.
Clicking the Monitoring button displays a new page showing up to the last 8 hours of performance data. It may take a minute or two for data to appear after initial deployment.
All deployments to an environment are shown directly on the monitoring dashboard, which allows easy correlation between any changes in performance and new versions of the app, all without leaving GitLab.
Embedding metrics in GitLab Flavored Markdown
Metric charts can be embedded within GitLab Flavored Markdown. See Embedding Metrics within GitLab Flavored Markdown for more details.
Web terminals
Web terminals were added in GitLab 8.15 and are only available to project Maintainers and Owners.
If you deploy to your environments with the help of a deployment service (for example, the Kubernetes integration), GitLab can open a terminal session to your environment.
This is a powerful feature that allows you to debug issues without leaving the comfort of your web browser. To enable it, follow the instructions given in the service integration documentation.
Note that container-based deployments often lack basic tools (like an editor), and may be stopped or restarted at any time. If this happens, you lose all your changes. Treat this as a debugging tool, not a comprehensive online IDE.
Once enabled, your environments gain a Terminal button:

You can also access the terminal button from the page for a specific environment:

Wherever you find it, clicking the button takes you to a separate page to establish the terminal session:
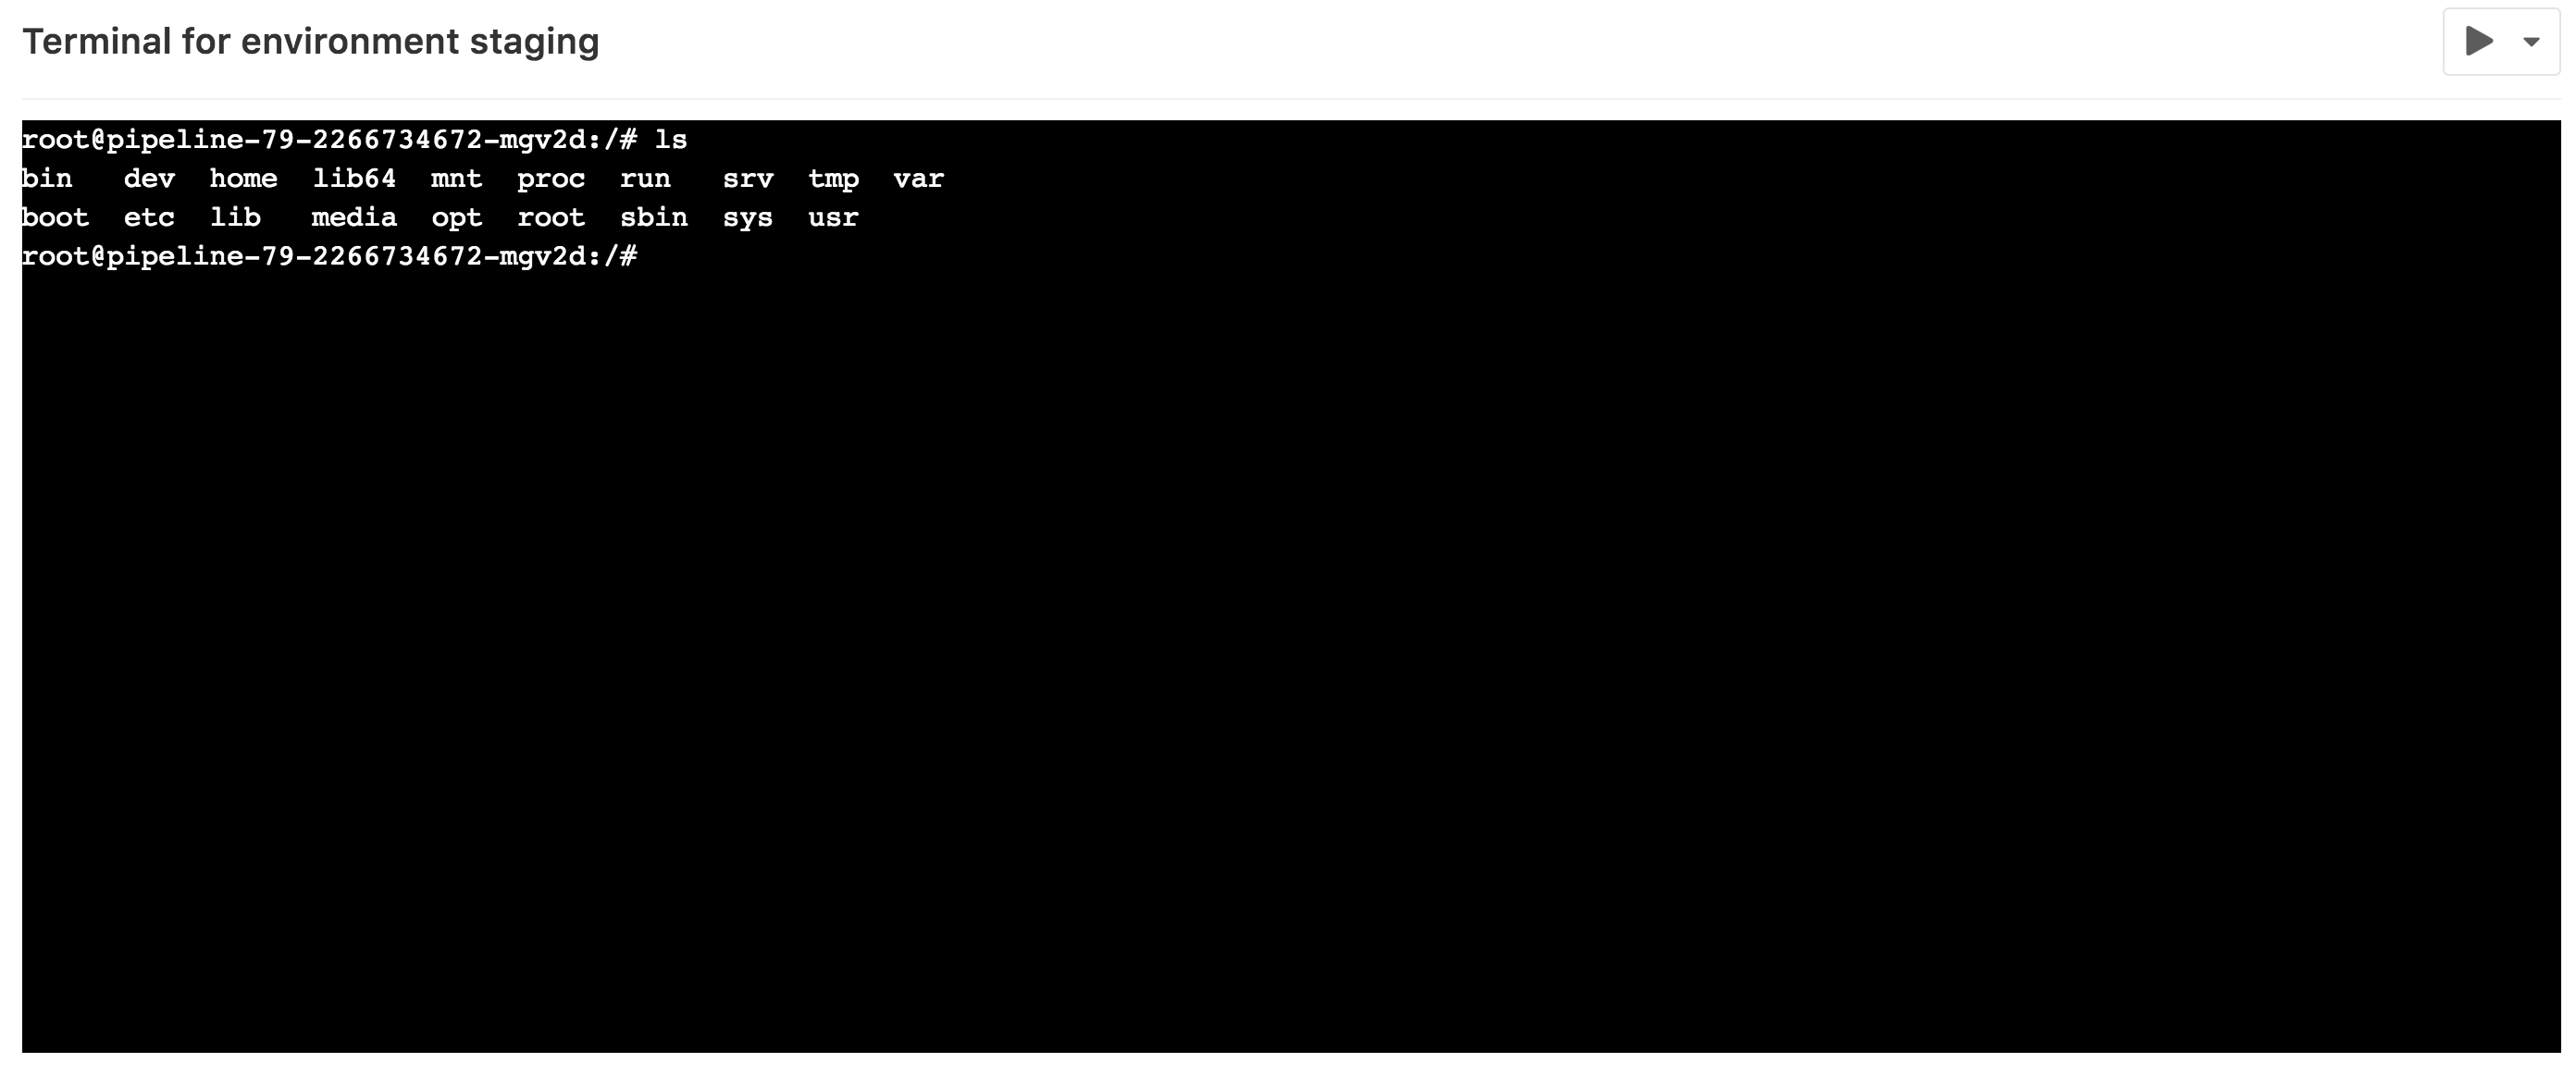
This works like any other terminal. You're in the container created by your deployment so you can:
- Run shell commands and get responses in real time.
- Check the logs.
- Try out configuration or code tweaks etc.
You can open multiple terminals to the same environment, they each get their own shell
session and even a multiplexer like screen or tmux.
Check out deployments locally
In GitLab 8.13 and later, a reference in the Git repository is saved for each deployment, so
knowing the state of your current environments is only a git fetch away.
In your Git configuration, append the [remote "<your-remote>"] block with an extra
fetch line:
fetch = +refs/environments/*:refs/remotes/origin/environments/*Scoping environments with specs
- Introduced in GitLab Premium 9.4.
- Scoping for environment variables was moved to Core in GitLab 12.2.
You can limit the environment scope of a variable by defining which environments it can be available for.
Wildcards can be used and the default environment scope is *. This means that
any jobs can have this variable regardless of whether an environment is defined.
For example, if the environment scope is production, then only the jobs
having the environment production defined would have this specific variable.
Wildcards (*) can be used along with the environment name, therefore if the
environment scope is review/* then any jobs with environment names starting
with review/ would have that particular variable.
Some GitLab features can behave differently for each environment. For example, you can create a secret variable to be injected only into a production environment.
In most cases, these features use the environment specs mechanism, which offers an efficient way to implement scoping within each environment group.
Let's say there are four environments:
productionstagingreview/feature-1review/feature-2
Each environment can be matched with the following environment spec:
| Environment Spec | production |
staging |
review/feature-1 |
review/feature-2 |
|---|---|---|---|---|
| * | Matched | Matched | Matched | Matched |
| production | Matched | |||
| staging | Matched | |||
| review/* | Matched | Matched | ||
| review/feature-1 | Matched |
As you can see, you can use specific matching for selecting a particular environment,
and also use wildcard matching (*) for selecting a particular environment group,
such as Review Apps (review/*).
Note that the most specific spec takes precedence over the other wildcard matching. In this case,
the review/feature-1 spec takes precedence over review/* and * specs.
Environments Dashboard (PREMIUM)
See Environments Dashboard for a summary of each environment's operational health.
Limitations
In the environment: name, you are limited to only the predefined environment variables.
Re-using variables defined inside script as part of the environment name doesn't work.
Further reading
Below are some links you may find interesting: