Unit test reports
- Introduced in GitLab 11.2. Requires GitLab Runner 11.2 and above.
- Renamed from JUnit test reports to Unit test reports in GitLab 13.4.
It is very common that a CI/CD pipeline contains a test job that will verify your code. If the tests fail, the pipeline fails and users get notified. The person that works on the merge request will have to check the job logs and see where the tests failed so that they can fix them.
You can configure your job to use Unit test reports, and GitLab will display a report on the merge request so that it's easier and faster to identify the failure without having to check the entire log. Unit test reports currently only support test reports in the JUnit report format.
If you don't use Merge Requests but still want to see the unit test report output without searching through job logs, the full Unit test reports are available in the pipeline detail view.
Consider the following workflow:
- Your
masterbranch is rock solid, your project is using GitLab CI/CD and your pipelines indicate that there isn't anything broken. - Someone from your team submits a merge request, a test fails and the pipeline gets the known red icon. To investigate more, you have to go through the job logs to figure out the cause of the failed test, which usually contain thousands of lines.
- You configure the Unit test reports and immediately GitLab collects and exposes them in the merge request. No more searching in the job logs.
- Your development and debugging workflow becomes easier, faster and efficient.
How it works
First, GitLab Runner uploads all JUnit report format XML files as artifacts to GitLab. Then, when you visit a merge request, GitLab starts comparing the head and base branch's JUnit report format XML files, where:
- The base branch is the target branch (usually
master). - The head branch is the source branch (the latest pipeline in each merge request).
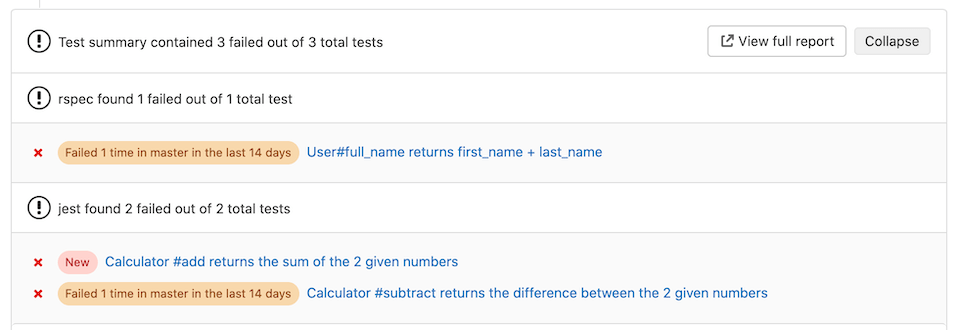
The reports panel has a summary showing how many tests failed, how many had errors and how many were fixed. If no comparison can be done because data for the base branch is not available, the panel will just show the list of failed tests for head.
There are four types of results:
- Newly failed tests: Test cases which passed on base branch and failed on head branch
- Newly encountered errors: Test cases which passed on base branch and failed due to a test error on head branch
- Existing failures: Test cases which failed on base branch and failed on head branch
- Resolved failures: Test cases which failed on base branch and passed on head branch
Each entry in the panel will show the test name and its type from the list above. Clicking on the test name will open a modal window with details of its execution time and the error output.
Number of recent failures
- Introduced in GitLab 13.7.
- Feature flag removed in GitLab 13.8.
If a test failed in the project's default branch in the last 14 days, a message like
Failed {n} time(s) in {default_branch} in the last 14 days is displayed for that test.
How to set it up
To enable the Unit test reports in merge requests, you need to add
artifacts:reports:junit
in .gitlab-ci.yml, and specify the path(s) of the generated test reports.
The reports must be .xml files, otherwise GitLab returns an Error 500.
In the following examples, the job in the test stage runs and GitLab
collects the Unit test report from each job. After each job is executed, the
XML reports are stored in GitLab as artifacts and their results are shown in the
merge request widget.
To make the Unit test report output files browsable, include them with the
artifacts:paths keyword as well, as shown in the Ruby example.
To upload the report even if the job fails (for example if the tests do not pass), use the artifacts:when:always
keyword.
You cannot have multiple tests with the same name and class in your JUnit report format XML file.
Ruby example
Use the following job in .gitlab-ci.yml. This includes the artifacts:paths keyword to provide a link to the Unit test report output file.
## Use https://github.com/sj26/rspec_junit_formatter to generate a JUnit report format XML file with rspec
ruby:
  stage: test
  script:
    - bundle install
    - bundle exec rspec --format progress --format RspecJunitFormatter --out rspec.xml
  artifacts:
    when: always
    paths:
      - rspec.xml
    reports:
      junit: rspec.xml
Go example
Use the following job in .gitlab-ci.yml, and ensure you use -set-exit-code,
otherwise the pipeline will be marked successful, even if the tests fail:
## Use https://github.com/jstemmer/go-junit-report to generate a JUnit report format XML file with go
golang:
  stage: test
  script:
    - go get -u github.com/jstemmer/go-junit-report
    - go test -v 2>&1 | go-junit-report -set-exit-code > report.xml
  artifacts:
    when: always
    reports:
      junit: report.xml
Java examples
There are a few tools that can produce JUnit report format XML file in Java.
Gradle
In the following example, gradle is used to generate the test reports.
If there are multiple test tasks defined, gradle will generate multiple
directories under build/test-results/. In that case, you can leverage glob
matching by defining the following path: build/test-results/test/**/TEST-*.xml:
java:
  stage: test
  script:
    - gradle test
  artifacts:
    when: always
    reports:
      junit: build/test-results/test/**/TEST-*.xml
In GitLab Runner 13.0
and later, you can use **.
Maven
For parsing Surefire
and Failsafe test
reports, use the following job in .gitlab-ci.yml:
java:
  stage: test
  script:
    - mvn verify
  artifacts:
    when: always
    reports:
      junit:
        - target/surefire-reports/TEST-*.xml
        - target/failsafe-reports/TEST-*.xml
Python example
This example uses pytest with the --junitxml=report.xml flag to format the output
into the JUnit report XML format:
pytest:
  stage: test
  script:
    - pytest --junitxml=report.xml
  artifacts:
    when: always
    reports:
      junit: report.xml
C/C++ example
There are a few tools that can produce JUnit report format XML files in C/C++.
GoogleTest
In the following example, gtest is used to generate the test reports.
If there are multiple gtest executables created for different architectures (x86, x64 or arm),
you will be required to run each test providing a unique filename. The results
will then be aggregated together.
cpp:
  stage: test
  script:
    - gtest.exe --gtest_output="xml:report.xml"
  artifacts:
    when: always
    reports:
      junit: report.xml
CUnit
CUnit can be made to produce JUnit report format XML files automatically when run using its CUnitCI.h macros:
cunit:
  stage: test
  script:
    - ./my-cunit-test
  artifacts:
    when: always
    reports:
      junit: ./my-cunit-test.xml
.NET example
The JunitXML.TestLogger NuGet package can generate test reports for .Net Framework and .Net Core applications. The following example expects a solution in the root folder of the repository, with one or more project files in sub-folders. One result file is produced per test project, and each file is placed in a new artifacts folder. This example includes optional formatting arguments, which improve the readability of test data in the test widget. A full .Net Core example is available.
## Source code and documentation are here: https://github.com/spekt/junit.testlogger/

Test:
  stage: test
  script:
    - 'dotnet test --test-adapter-path:. --logger:"junit;LogFilePath=..\artifacts\{assembly}-test-result.xml;MethodFormat=Class;FailureBodyFormat=Verbose"'
  artifacts:
    when: always
    paths:
      - ./**/*test-result.xml
    reports:
      junit:
        - ./**/*test-result.xml
JavaScript example
There are a few tools that can produce JUnit report format XML files in JavaScript.
Jest
The jest-junit npm package can generate test reports for JavaScript applications.
In the following .gitlab-ci.yml example, the javascript job uses Jest to generate the test reports:
javascript:
  stage: test
  script:
    - 'jest --ci --reporters=default --reporters=jest-junit'
  artifacts:
    when: always
    reports:
      junit:
        - junit.xml
Karma
The Karma-junit-reporter npm package can generate test reports for JavaScript applications.
In the following .gitlab-ci.yml example, the javascript job uses Karma to generate the test reports:
javascript:
  stage: test
  script:
    - karma start --reporters junit
  artifacts:
    when: always
    reports:
      junit:
        - junit.xml
Viewing Unit test reports on GitLab
- Introduced in GitLab 12.5 behind a feature flag (
junit_pipeline_view), disabled by default.- The feature flag was removed and the feature was made generally available in GitLab 13.3.
If JUnit report format XML files are generated and uploaded as part of a pipeline, these reports can be viewed inside the pipelines details page. The Tests tab on this page will display a list of test suites and cases reported from the XML file.

You can view all the known test suites and click on each of these to see further details, including the cases that make up the suite.
You can also retrieve the reports via the GitLab API.
Viewing JUnit screenshots on GitLab
- Introduced in GitLab 13.0.
- It's deployed behind a feature flag, disabled by default.
- To use it in GitLab self-managed instances, ask a GitLab administrator to enable it. (CORE ONLY)
If JUnit report format XML files contain an attachment tag, GitLab parses the attachment.
Upload your screenshots as artifacts to GitLab. The attachment tag must contain the absolute path to the screenshots you uploaded.
<testcase time="1.00" name="Test">
  <system-out>[[ATTACHMENT|/absolute/path/to/some/file]]</system-out>
</testcase>
When this issue is complete, the attached file will be visible on the pipeline details page.
Enabling the JUnit screenshots feature (CORE ONLY)
This feature comes with the :junit_pipeline_screenshots_view feature flag disabled by default.
To enable this feature, ask a GitLab administrator with Rails console access to run the following command:
Feature.enable(:junit_pipeline_screenshots_view)