Snippets
With GitLab Snippets you can store and share bits of code and text with other users.

Snippets can be maintained using snippets API.
There are two types of snippets:
- Personal snippets.
- Project snippets.
Personal snippets
Personal snippets are not related to any project and can be created completely independently. There are 3 visibility levels that can be set, public, internal and private. See Public access for more information.
Project snippets
Project snippets are always related to a specific project. See Project features for more information.
Create a snippet
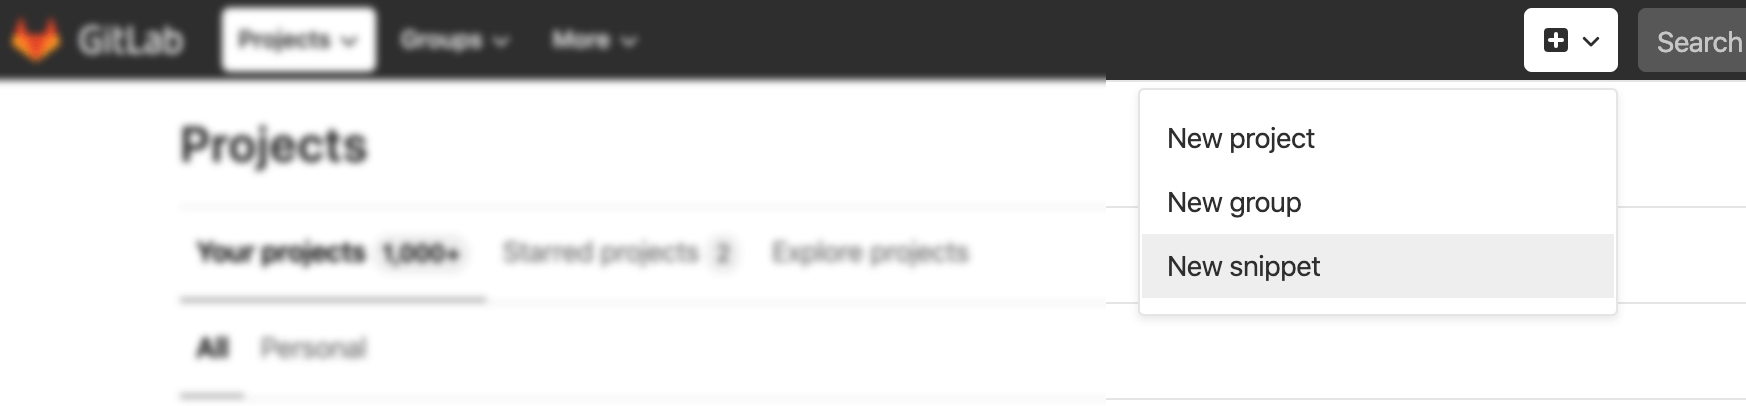
To create a personal snippet, click the plus icon ({plus-square-o}) on the top navigation and select New snippet from the dropdown menu:
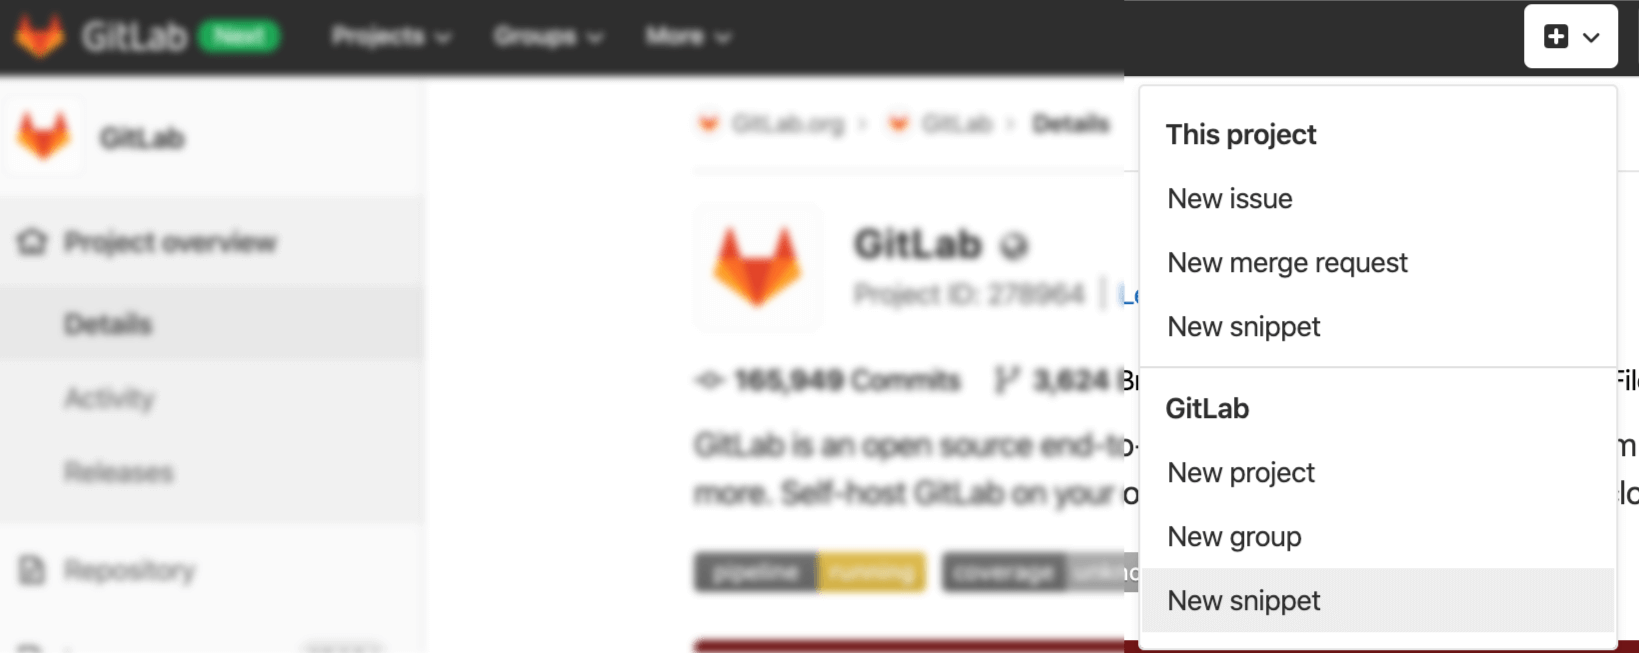
If you're on a project's page but you want to create a new personal snippet, click the plus icon ({plus-square-o}) and select New snippet from the lower part of the dropdown (GitLab on GitLab.com; Your Instance on self-managed instances):
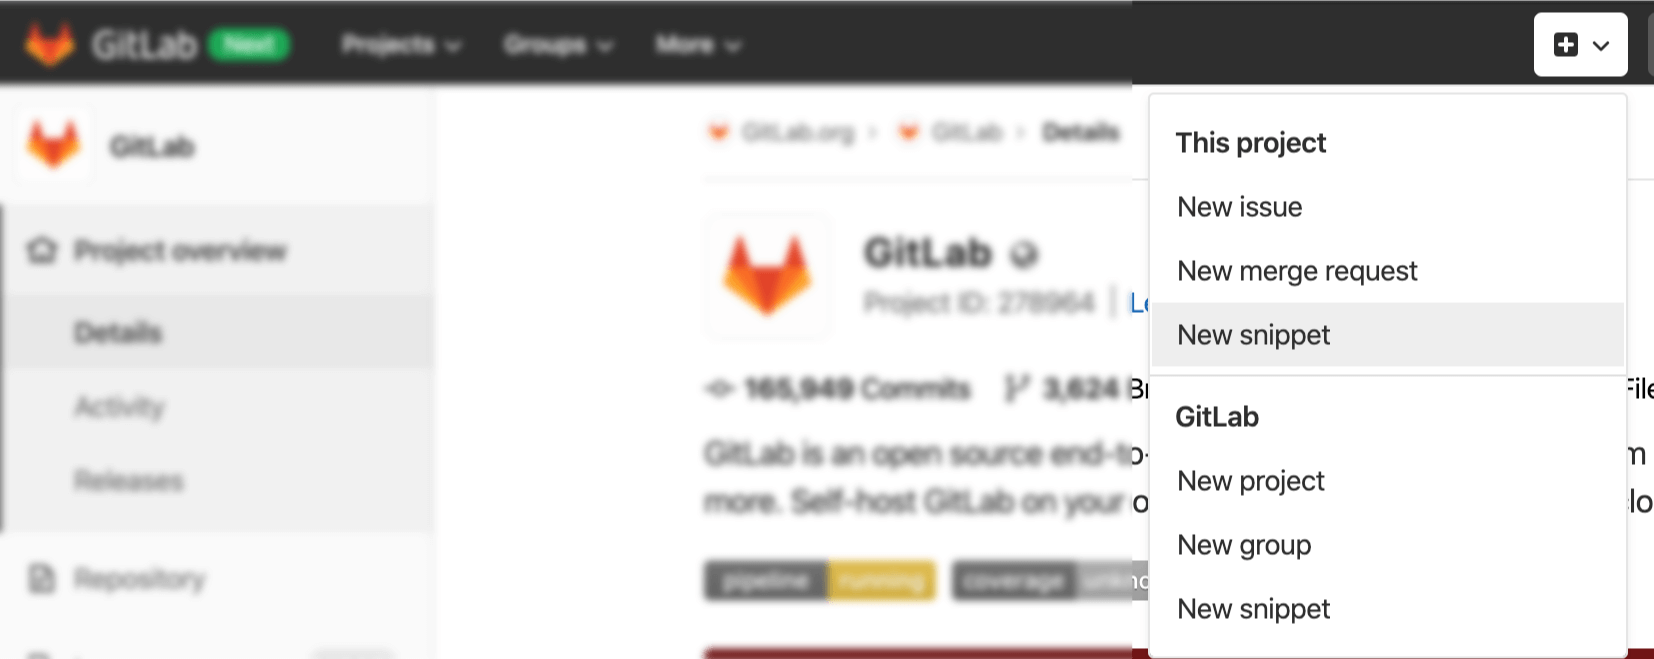
To create a project snippet, navigate to your project's page and click the plus icon ({plus-square-o}), then select New snippet from the upper part of the dropdown (This project).
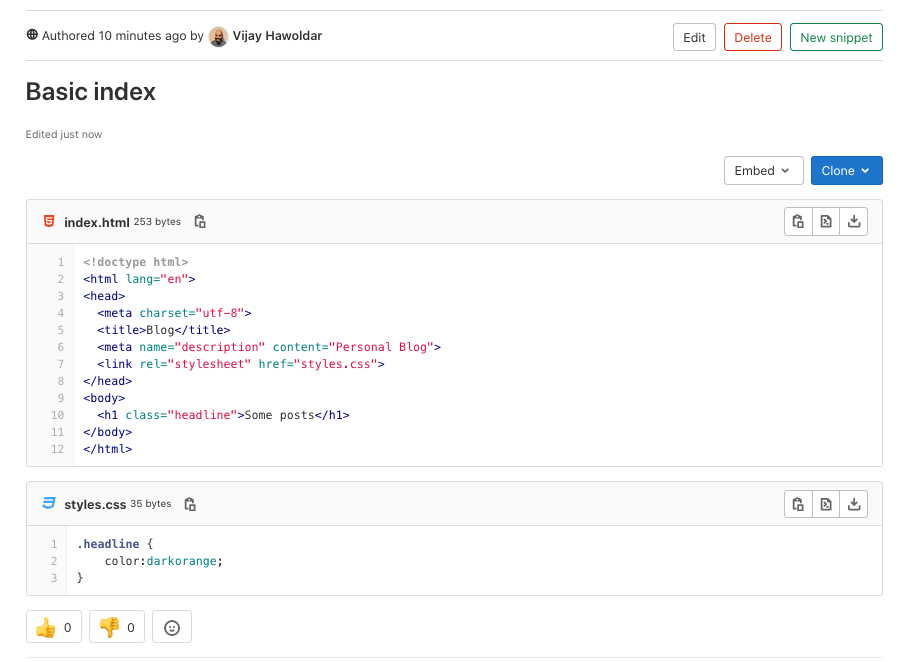
From there, add the Title, Description, and a File name with the
appropriate extension (for example, example.rb, index.html).
WARNING: Make sure to add the filename to get code highlighting and to avoid this copy-pasting bug.
Versioned Snippets
Introduced in GitLab 13.0.
Starting in 13.0, snippets (both personal and project snippets) have version control enabled by default.
This means that all snippets get their own underlying repository initialized with
a master branch at the moment the snippet is created. Whenever a change to the snippet is saved, a
new commit to the master branch is recorded. Commit messages are automatically
generated. The snippet's repository has only one branch (master) by default, deleting
it or creating other branches is not supported.
Existing snippets are automatically migrated in 13.0. Their current content is saved as the initial commit to the snippets' repository.
Filenames
Snippets support syntax highlighting based on the filename and extension provided for them. While it is possible to submit a snippet without specifying a filename and extension, it needs a valid name so the content can be created as a file in the snippet's repository.
In case the user does not attribute a filename and extension to a snippet,
GitLab automatically adds a filename in the format snippetfile<x>.txt
where <x> represents a number added to the file, starting with 1. This
number increases incrementally when more snippets without an attributed
filename are added.
When upgrading from an earlier version of GitLab to 13.0, existing snippets
without a supported filename are renamed to a compatible format. For
example, if the snippet's filename is http://a-weird-filename.me it is
changed to http-a-weird-filename-me to be included in the snippet's
repository. As snippets are stored by ID, changing their filenames breaks
direct or embedded links to the snippet.
Multiple files by Snippet
Introduced in GitLab 13.5.
GitLab Snippets support multiple files in one single snippet. It can be very handy when your code snippet is composed of multiple parts or when they relate to a certain context. For example:
- A snippet that includes a script and its output.
- A snippet that includes HTML, CSS, and JS code.
- A snippet with a
docker-compose.ymlfile and its associated.envfile. - A
gulpfile.jsfile coupled with apackage.jsonfile, which together can be used to bootstrap a project and manage its dependencies.
Snippets support between 1 and 10 files. They can be managed via Git (because they're versioned by a Git repository), through the Snippets API, or in the GitLab UI.
To add a new file to your snippet through the GitLab UI:
- Go to your snippet in the GitLab UI.
- Click Edit in the top right.
- Select Add another file.
- Add your content to the file in the form fields provided.
- Click Save changes.
To delete a file from your snippet through the GitLab UI:
- Go to your snippet in the GitLab UI.
- Click Edit in the top right.
- Select Delete file alongside the filename of each file you wish to delete.
- Click Save changes.
Cloning snippets
Snippets can be cloned as a regular Git repository using SSH or HTTPS. Click the Clone button above the snippet content to copy the URL of your choice.
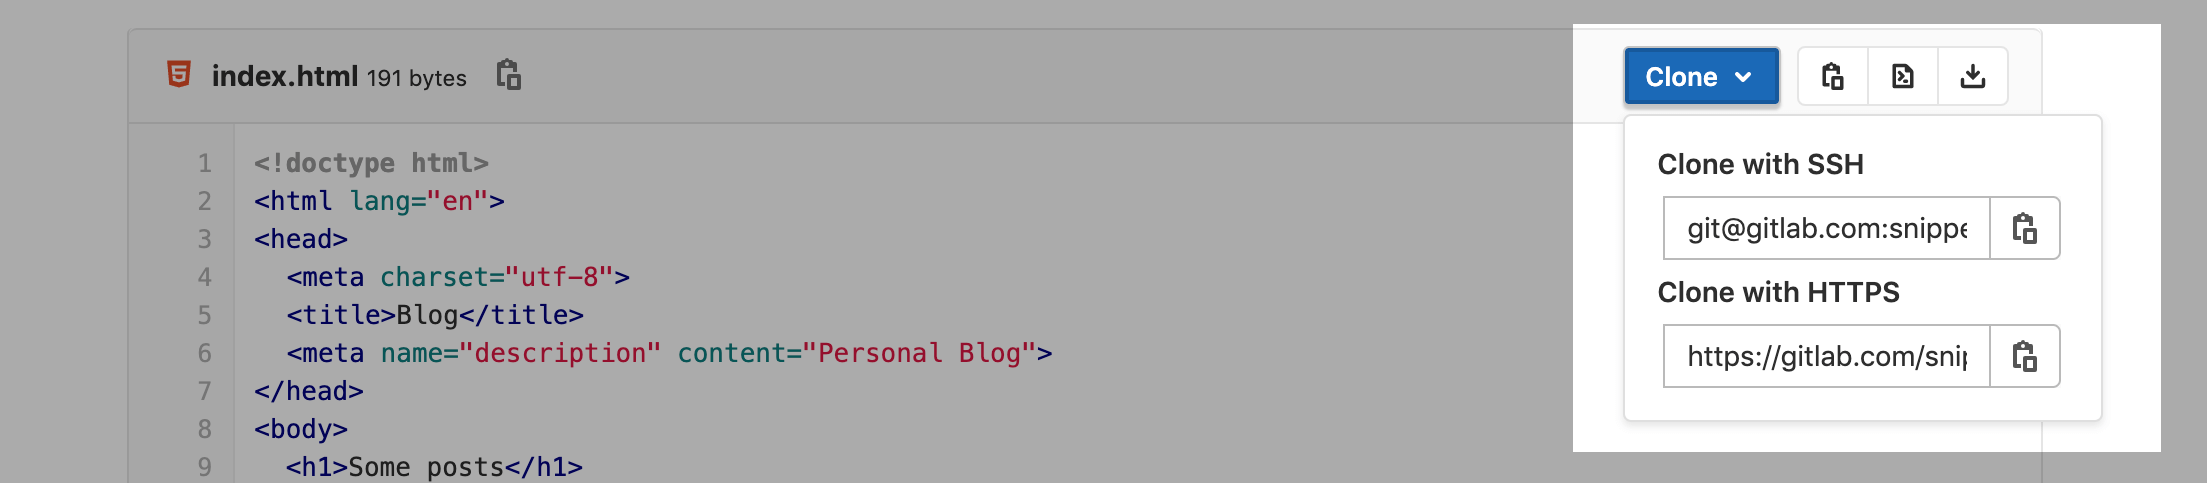
This allows you to have a local copy of the snippet's repository and make changes as needed. You can commit those changes and push them to the remote master branch.
Reduce snippets repository size
Because versioned Snippets are considered as part of the namespace storage size, it's recommended to keep snippets' repositories as compact as possible.
For more information about tools to compact repositories, see the documentation on reducing repository size.
Limitations
- Binary files are not supported.
- Creating or deleting branches is not supported. Only a default master branch is used.
- Git tags are not supported in snippet repositories.
- Snippets' repositories are limited to 10 files. Attempting to push more than 10 files results in an error.
- Revisions are not yet visible to the user on the GitLab UI, but it's planned to be added in future iterations. See the revisions tab issue for updates.
- The maximum size for a snippet is 50 MB, by default.
- Git LFS is not supported.
Discover snippets
There are two main ways of how you can discover snippets in GitLab.
For exploring all snippets that are visible to you, you can go to the Snippets dashboard of your GitLab instance via the top navigation. For GitLab.com you can navigate to an overview that shows snippets you created and allows you to explore all snippets.
If you want to discover snippets that belong to a specific project, you can navigate to the Snippets page via the left side navigation on the project page. Project snippets are enabled and available by default, but they can be disabled by navigating to your project's Settings, expanding Visibility, project features, permissions and scrolling down to Snippets. From there, you can toggle to disable them or select a different visibility level from the dropdown menu.
Snippet comments
Introduced in GitLab 9.2.
With GitLab Snippets you engage in a conversation about that piece of code, facilitating the collaboration among users.
Downloading snippets
You can download the raw content of a snippet.
By default snippets are downloaded with Linux-style line endings (LF). If
you want to preserve the original line endings you need to add a parameter line_ending=raw
(For example: https://gitlab.com/snippets/SNIPPET_ID/raw?line_ending=raw). In case a
snippet was created using the GitLab web interface the original line ending is Windows-like (CRLF).
Embedded snippets
Introduced in GitLab 10.8.
Public snippets can not only be shared, but also embedded on any website. With this, you can reuse a GitLab snippet in multiple places and any change to the source is automatically reflected in the embedded snippet.
To embed a snippet, first make sure that:
- The project is public (if it's a project snippet)
- The snippet is public
- In Project > Settings > Permissions, the snippets permissions are set to Everyone with access
After the above conditions are met, the "Embed" section appears in your snippet where you can simply click on the "Copy" button. This copies a one-line script that you can add to any website or blog post.
Here's how an example code looks like:
<script src="https://gitlab.com/namespace/project/snippets/SNIPPET_ID.js"></script>Here's how an embedded snippet looks like:
Embedded snippets are displayed with a header that shows the filename if it's defined, the snippet size, a link to GitLab, and the actual snippet content. Actions in the header allow users to see the snippet in raw format and download it.